


Summary: I'm making a case for a certain type of debugger.
More detail below.
A couple times people trying to get into ROM patching ask me what tool I use. I'll answer, although it's not the popular answer. It takes some getting used to because of type of debugging it is and for other reasons.
What I use for most of my patching stuff is Geiger's SNES debugger. It's a special build of Snes9x with a debugger bolted on.
Looks like this
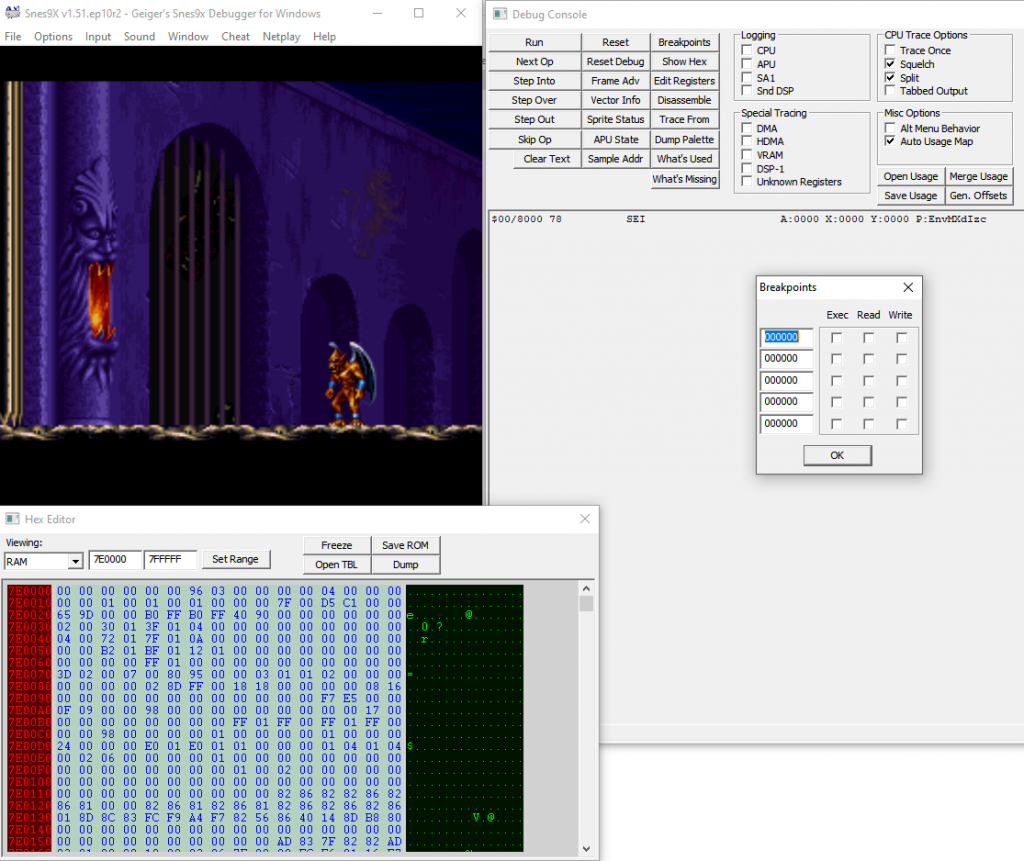
The game, main debugger interface, and memory view are in different windows. You press the 'Breakpoints' button to get a pop-up dialog for setting those. Looks very Win32 ish.
Why not for everyone?
When I first started looking into debugging SNES it was a while ago, this was one of the best options available.
Since then, the world has moved on.
Despite the age of the SNES today, there is a lot of information out there sourced by fans and tools under active development.
Today, there are SNES debuggers that
- have larger feature sets
- have been tested more thoroughly to weed out issues
- have interfaces that suit newer UI/UX paradigms
- are actively developed
- are open-source and so are easy to extend
The debugger has some 'personality traits' I've gotten used to working around. Here's a list of what they are in case you run into them.
Issue: Breakpoints don't hit after certain operations (e.g., save state load)
Workaround: Re-open the breakpoint window, and click OK.
Issue: Step Out doesn't step out to the expected place
Workaround: Don't rely on Step Out for function calls that straddle any interrupts.
Issue: 'Show Hex' (memory) window shows blank ROM on 1st open
Workaround: Choose something (e.g., RAM) 'viewing' dropdown then go back to ROM.
Issue: Emulator crash if you scroll too far down in the memory window
Workaround: Don't use invalid ranges. Don't try to scroll past the end of the range.
Issue: Can not view CGRAM or OAM
Workaround: Use a different debugger.
Issue: Can not view DBR or PBR
Workaround: Edit some code to push them (PHB/PHK) then PLA.
Software
The debugger isn't under active development anymore so things like the above list are what they are. I contacted Geiger asking for the source code. He responded wishing me well, and wouldn't give it to me for various reasons which is his perogative.
None of these were bad enough to block me, it's been alright.
They also weren't severe enough to be motivating to go in and fix them in this closed-source program.
Why I use it
Despite the above things, I still use it for a few reasons.
- Habit. I know my way around it
- The most complicated parts of what I need to do aren't actually through a debugger, (e.g., 'special diffing' of memory dumps), and a debugger could never do as good a job as flexible-function code.
- Transcript-style debugging.
The biggest one is transcript debugging.
For transcript-style debugging see explanation below.
Transcript-style debugging
For ROM patching projects where the patch is a small targeted surface area, generally speaking you're not trying to recover source code.
Recovering source code so that you can work in it is something you can do if you really want. You can do it if it makes you happy. But it's not always crucial. It can even be a distraction. Be it in an assembly language or a higher-level language like C/C++, recovering source code can be unnecessary for your goal of a targeted change in behavior and can make the task way less efficient.
To get better at this kind of reverse-engineering task, and this is hard for a lot of people to hear-- you need to fall out of love with source code written in programming languages. This includes source-level debugging, it includes expressions of flow control, and this includes source code written in assembly languages.
Below is an example of a debugger listing not using source-level debugging, and using transcript-style debugging instead:
$80/BC3A 20 B0 C1    JSR $C1B0  [$80:C1B0]   A:0000 X:00A9 Y:0005 P:envmXdizc

$80/C1B0 64 6F       STZ $6F    [$00:006F]   A:0000 X:00A9 Y:0005 P:envmXdizc
$80/C1B2 A5 6C       LDA $6C    [$00:006C]   A:0000 X:00A9 Y:0005 P:envmXdizc
$80/C1B4 0A          ASL A                   A:3640 X:00A9 Y:0005 P:envmXdizc
$80/C1B5 88          DEY                     A:6C80 X:00A9 Y:0005 P:envmXdizc
$80/C1B6 F0 13       BEQ $13    [$C1CB]      A:6C80 X:00A9 Y:0004 P:envmXdizc
$80/C1B8 90 38       BCC $38    [$C1F2]      A:6C80 X:00A9 Y:0004 P:envmXdizc
$80/C1F2 86 00       STX $00    [$00:0000]   A:6C80 X:00A9 Y:0004 P:envmXdizc
$80/C1F4 A2 02       LDX #$02                A:6C80 X:00A9 Y:0004 P:envmXdizc
$80/C1F6 0A          ASL A                   A:6C80 X:0002 Y:0004 P:envmXdizc
$80/C1F7 88          DEY                     A:D900 X:0002 Y:0004 P:eNvmXdizc
$80/C1F8 F0 20       BEQ $20    [$C21A]      A:D900 X:0002 Y:0003 P:envmXdizc
$80/C1FA E8          INX                     A:D900 X:0002 Y:0003 P:envmXdizc
$80/C1FB 90 F9       BCC $F9    [$C1F6]      A:D900 X:0003 Y:0003 P:envmXdizc
$80/C1F6 0A          ASL A                   A:D900 X:0003 Y:0003 P:envmXdizc
$80/C1F7 88          DEY                     A:B200 X:0003 Y:0003 P:eNvmXdizC
$80/C1F8 F0 20       BEQ $20    [$C21A]      A:B200 X:0003 Y:0002 P:envmXdizC
"But isn't this source code in assembly language?" I heard this question before. I think this confusion comes from people who haven't done much forward engineering with assembly languages yet, forget reverse engineering.
The above is not source code, it's a debugger transcript.
Again, it's not source code, it's printout of what got executed, one instruction at a time.
Dead giveaways that it's not source code
- Every line starts with an address
- Every line ends with register state
- There's a function call and then the stepped-into body immediately after. Not proper for source code
- Some instructions are repeated, like $80/C1F6, $80/C1F7, $80/C1F8. This is a loop
Thinking it's source code is pretty uncharitable to the readability of source code, which usually uses more identifiers and comments and labels and stuff than this example has.
The transcript looks different from source code, and transcript debugging is different from source style debugging.
How is transcript debugging different?
Now that we know what transcripts are: transcript-style debugging is different from source-style, or traditional debugging.
See an example of source-style debugging, with No$sns:
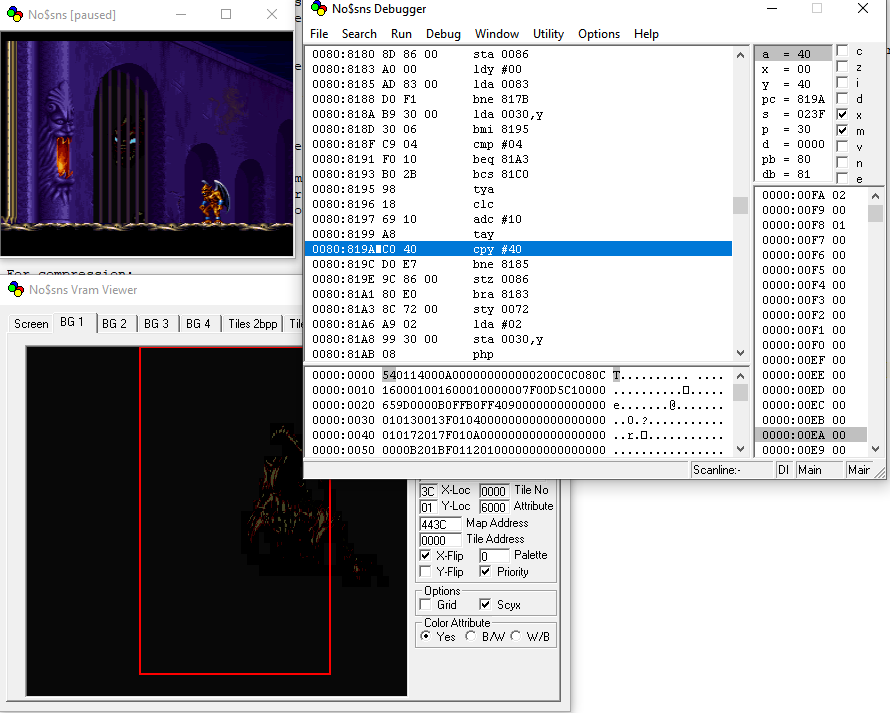
There's a window. In the window, the local disassembly appears in a listing, with the current instruction highlighted in blue. The local disassembly shows instructions laid out in one contiguous block of memory.
Or, here's another debugger, bsnes:
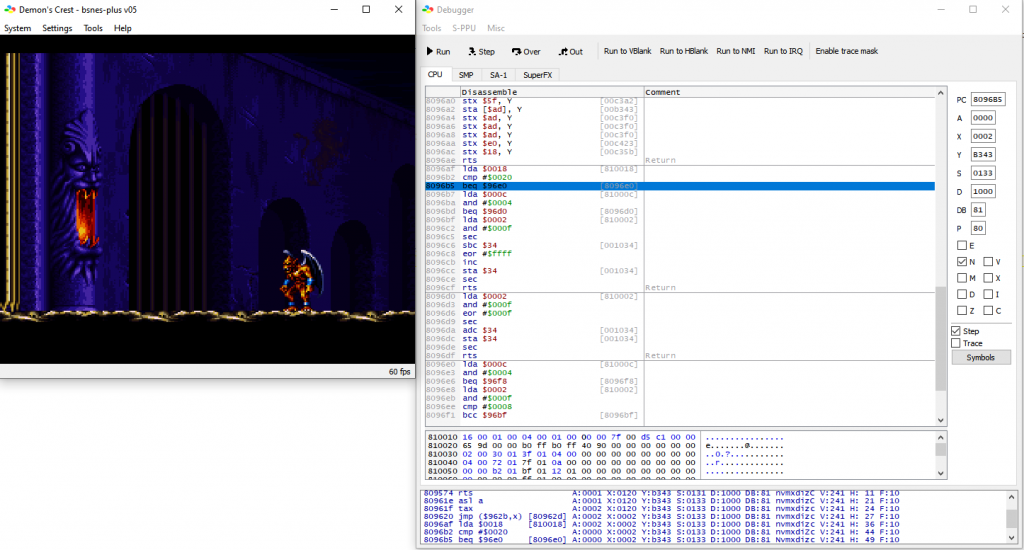
Another example of source-style debugging. The disassembly listing is on the right, with the current instruction highlighted in blue. They go the extra mile and put dividing lines in at observed function boundaries. I don't think that can ever be 100% robust but it's nice regardless.
Or, here's Visual Studio 2019:
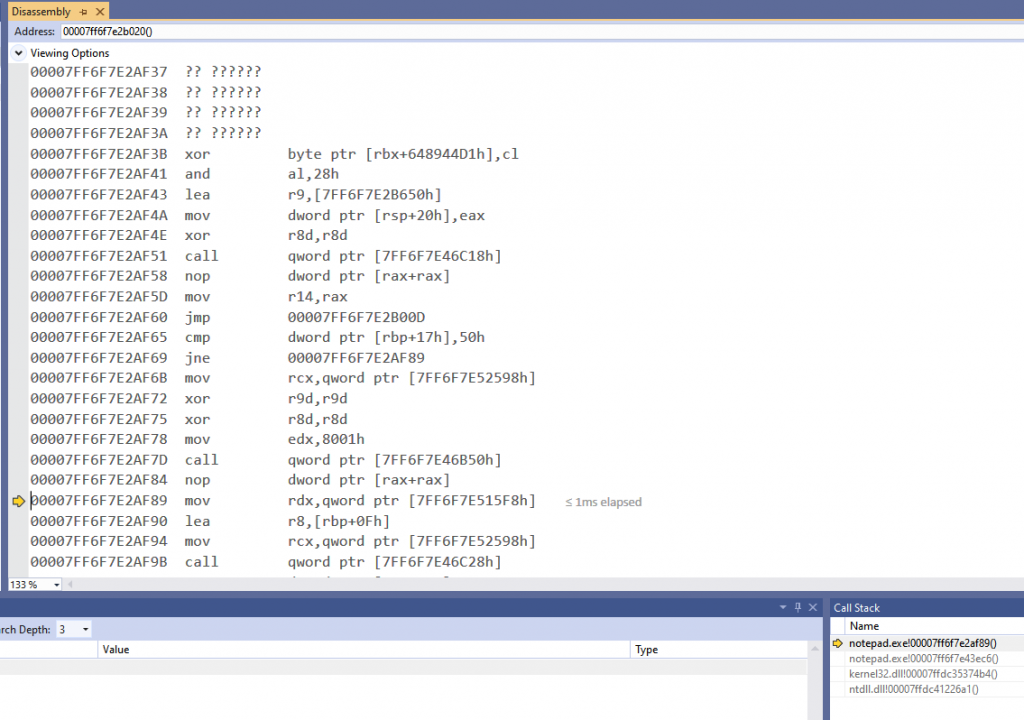
The instructions are listed out. The current instruction is highlighted with a yellow arrow to the left of it. There's some things that couldn't be disassembled so there's a placeholder with question marks.
These are all examples of source-style debugging. It's very popular.
Depending on the implementation, the listing in a source-style debugger can either be
- a local disassembly where all surrounding memory gets interpreted as code, whether it actually is code or not, or
- the result of a tracing, where only executed instructions appear in the listing, creating gaps
The former is a lot more common, as in all the above examples, although I've seen both.
By contrast, a transcript style debugger will look like this:
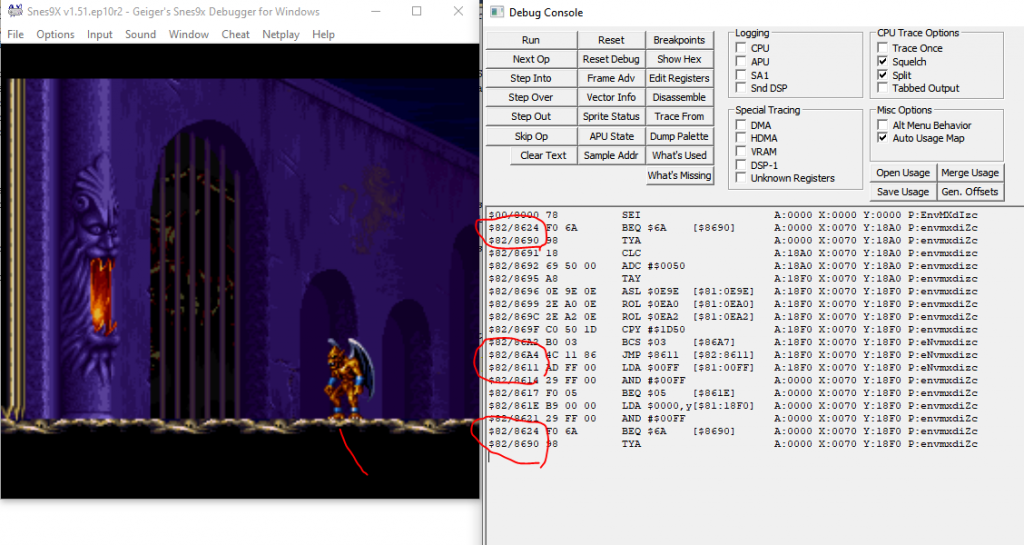
See, there are disjoint instructions, with those pairs circled in red.
Some instructions are listed more than once.
And register state is shown on each line. This platform doesn't have a ton of register space so that's honestly pretty manageable.
The transcript shows all branches with the branch taken, all registers with state at the time, all opcodes with their resolved argument, all loops are unrolled.
The kicker is that implementation of this debugger is dead simple and actually very dumb. It echoes each executed instruction to the output, along with the current register state. That's it.
Yet it is powerful and offers some advantages.
Advantage: history of register values
It's true pretty much all debuggers will show you register values, or variable/memory values at the current instruction. But what about 5 or 10 instructions ago?
You need to either have time-travel debugging, log it, or restart your program.
Some debuggers will cache the "last seen" way something executed (pointer argument, etc), and update it when that instruction is executed again. Great, you can see what was the last way something executed.
But what about the time before that? Or earlier? You can't easily put together a history of what happened unless you log these data points manually yourself.
For reverse-engineering object code with no source code, getting this history is really important in figuring out what happened. You might need to look for trends, look for a pattern, to get a sense of the higher level algorithm. Or you might want transcripts even with code you are familiar with, to get something like a time-travel trace on platforms where actual time-travel isn't available. There's strictly more information in the transcript than in the source-style listing.
"But, it's only outputting registers each line, not all of memory each line". That's true. Each line of the transcript is not a complete state of the machine. I think register state is the right tradeoff to suit most tasks. The exact choice will depend on the platform and the situation. If you're blessed with extensible transcript debugging, that'd probably be the best thing, so you could have like a "watch window" for each line. Generally for SNES, A/X/Y/P is perfectly fine.
Advantage: history of flow control
You can see a clear history of flow control. After all, that's useful. With a couple source-style debuggers, I've seen them do crazy things like try and draw a cute arrow denoting a function was stepped into.
With a transcript, you can see a history of how many times a loop ran, what index of a jump table was used, and which branches had the branch taken. If you save longer transcripts (e.g., with Geiger's SNES debugger's CPU log feature) you can also meaningfully diff transcripts with any text diffing tool of your choice to find divergent control flow like this.
With source-style debugging, you have no record-keeping of this unless you log it yourself, and you can easily miss what you're looking for.
Advantage: An edge case
This is a bad scenario and not something I've ever seen happen out in the wild.
But you could have it where the same memory is executed twice with the code interpreted in different ways, e.g., 8 bit versus 16 bit native mode.
I don't think a source style debugger could easily make sense of this. A transcript would show what happened clearly.
I made a proof of concept that does this and on testing it doesn't work well at all in a source-style debugger.
Advantage: Don't disassemble stuff that's not code
This is a big one, SNES games will often litter non-code throughout code.
For example of what I mean, this is bsnes broken in NHL '94's graphics decompression
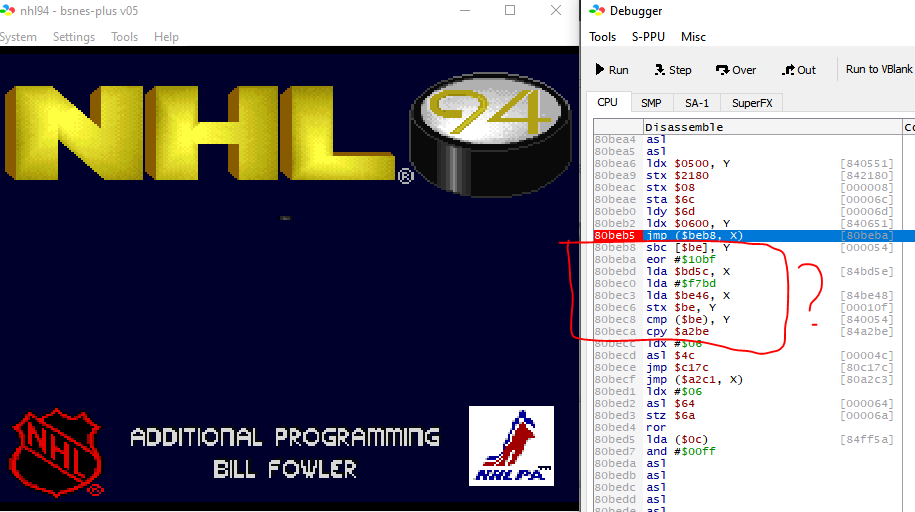
See the part outlined in red. Although there's no obviously illegal instructions, it looks suspicious. Why the CPY with such an arbitrary magic number address? Same with the EOR and the literal, what's up with that? Why the LDAs that immediately get overwritten?
The answer is this isn't code at all. It's data. This source-style debugger will disassemble everything in the neighborhood. That works great only so long as it actually is code. You hope it looks like obvious garbage code, so you can quickly spot it.
In this case, it's actually an array of short pointer offsets baked into the middle of object code. Those are supposed to be offsets, not instructions. If you're really observant you'll see that the preceding JMP $BEB8, X indexes into it and jumps based on an element. It's a hassle to spot this right away, and the debugger isn't doing anything to help you.
Here's another example in a different place

Again red outlined part is not actually code, it's data. This one's sneakier than the above because from a glance it looks less garbage compared to the last one. The big giveaway is SED which is not commonly used.
With transcripts, we don't have this problem. These garbage instructions aren't something you have to discern from non-garbage. Why? Because they don't get executed. They don't even appear.
Why is there data beside the code?
SNES is a different kind of execution environment from what some people are used to.
For the situation above, you might have the reaction "But I work in x86 a lot and I've never seen this before."
Well, x86-64 applications won't have data sprinkled in the code.
Why? Because Intel's architecture does really aggressive instruction prefetching, and the CPU has to know what's code versus what's data for that to work.
You can hear it from Intel themselves:
If (hopefully read-only) data must occur on the same page as code, avoid placing it immediately after an indirect jump. For example, follow an indirect jump with its mostly likely target, and place the data after an unconditional branch.
[...]
Always put code and data on separate pages.
Source: Intel's Optimization Guide
If you write source code that is compiled, the compiler will put object code in the .text segment and constant data in the .rodata segment- it'll do that for you.
Or if you write source code in x86 assembly language, you'd would use a directive like .CODE or .DATA to explicitly define what goes where.
The WDC 65xx-based CPU, on the other hand, is out there living its best life. Memory is just memory, doesn't matter what's where.
Since it doesn't matter at all, it's up to developer preference and convenience. In practice I do notice developers for 65xx platform dump data in the middle of their code like all the time. They'll bake data local in the same bank to take advantage of direct addressing, since if you put all data together it'd have to go in a different bank to fit. Or they're trying to save a MMU page change on certain computers where that matters (e.g., Foenix F256). Or they'll use a self-modified jump instruction instead of a jump table.
So if you work mostly in x86-64 or any other compiler toolchain with the same recommendation, that's one more reason why you probably go through life dealing with source style debuggers. No surprise data tripping you up. It's probably not something you ever think about.
With reverse-engineering on a platform like SNES the value of transcripts is more clear.
Recommendation
Geiger's SNES debugger is a transcript-style debugger, and you should consider it or something similar if you are debugging SNES without source code.
I also think transcript-style debugging is something we as an industry should consider more for debugging object code without source code. The benefit of source-style assembly debugging really only shines when you have symbolic debugging, or corresponding source code.
Using transcripts liberates you where you're not burdened with mapping control flows back to source code, there is only a series of behaviors. You could map them back to code, eventually. It's just not where you start.
Practical justification: I used transcripts to get these done
- Ripping all maps of Lagoon
- Enlarging the hitboxes in Lagoon
- Making an NHL '94 player name, profile and stats editor
- Making an NHL '94 player graphics decompression tool that's 100% accurate to the game's
- Fixed a bug in Lord of the Rings
- Disabling collisions in Lord of the Rings
- Make plants in Harvest Moon be automatically watered
Bonus: Adding transcripts to C256 Foenix IDE debugger
C256 Foenix is a modern WDC 65816-based computer with an emulator.
For personal convenience I added transcript-style debugging to it, looks like this:
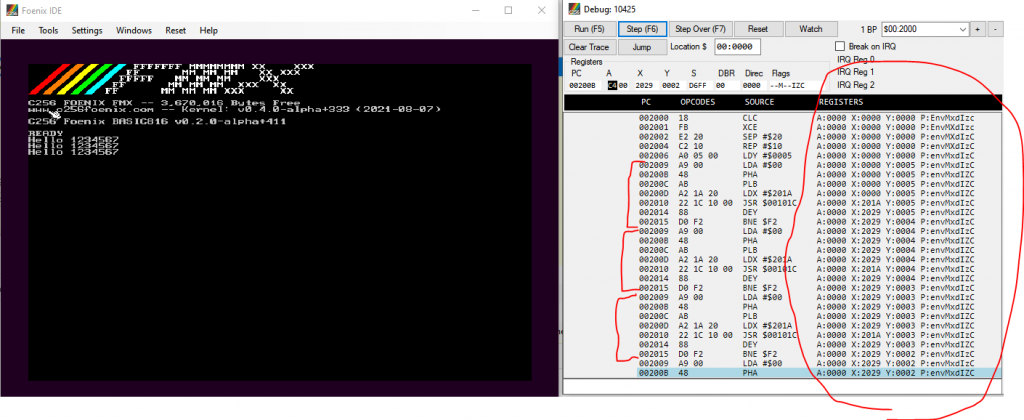
See there's duplicated instructions for a loop, and register output. With source-style, the listing looks like this, which provides a lot less information:
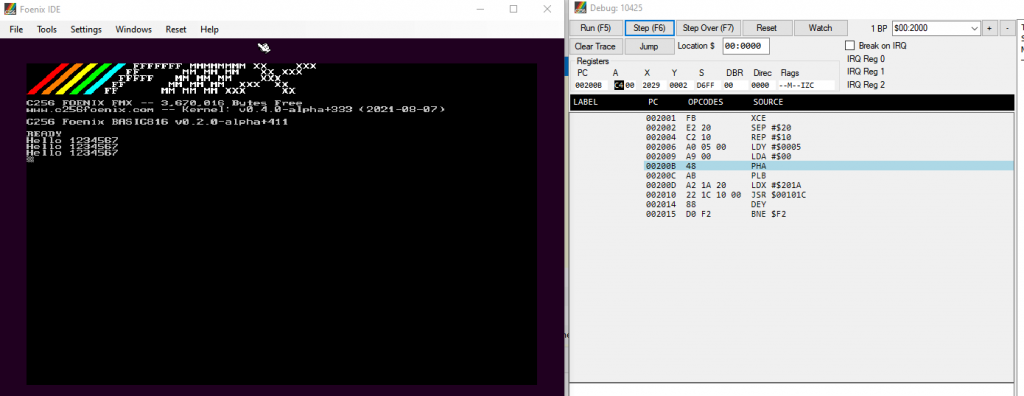
This transcript support is kept side-by-side with the default source-style debugger so that you can switch between them.
Enable it by going to "Settings" and checking the box for "Transcript-style debugger". When the box isn't checked, you get the default source-style debugger. The checkbox setting is remembered like the other settings so you don't need to check it every time.
I've already got some good use out of it. If you want to try it out, it's pushed to this private fork:
https://github.com/clandrew/FoenixIDE/tree/transcript
I did ask the developer of the emulator if he wanted to take a change like this to main. He said no. Not because he wouldn't take changes to the assembly listing format, but because he didn't see the value of transcript debugging.
Short version: To disable collisions e.g., walk through walls in J. R. R. Tolkien's Lord of the Rings for SNES, use the following Pro Action Replay codes
80E0C780 (Disable horizontal collisions)
80E13480 (Disable vertical collisions)
Longer explanation below.
There are some areas in maps I wanted to look at in this game, and those areas are inaccessible playing the game normally. How can you look at inaccessible parts of the game?
One option: rip the map. That would work, although it's very hard. It would cascade into the problem of also ripping the tileset graphics and figuring out how the each map datum maps to which tile. I did this process once for a different game, Lagoon. Those maps are here. It was doable because I already did some other projects involving that game so I had some information about it. For games I'm less familiar with, like LotR, it will take longer, probably so long it's not worth it.
An easier option instead is to disable collisions. So I set out to do that.
The general sense I had was that this will be a code change to the collision logic in the game. Some code must take the player's position, do some comparisons on it, and permit you to move or not move based on the comparisons. But which code is doing this?
1. Where position is stored
Breaking the problem down, the first step is to find where your position is stored in memory. It's likely to be an X, Y position since what kind of a maniac would store it in polar.
So there's a number, somewhere in the program. Classic problem where we don't know where it is stored. But worse yet, we also don't know what the number is, what its value is.
When faced with this kind of problem I do something I'm calling "special diffing", you can call it whatever you want, basically you take 3 or more memory dumps.
- For dump 0, you've got your character somewhere.
- For dump 1, you move them a little bit to the right.
- For dump 2, you move them a little bit more to the right.
And then write some code that opens the dumps, looking through each offset for some number that's increasing from dump 0 to 1, and 1 to 2. Want more confidence? Take more memory dumps to have more data points.
Why move horizontal and not vertical? Because there isn't a strong convention in computer graphics about whether up is positive or not. For horizontal there's a pretty strong convention.
Why move to the right, and not left? Convenience, we probably expect the position value to increase going to the right.
Why move just a little, and not a lot? So that you don't overflow the byte type (e.g., exceed 255) since that's a hassle to account for.
Using this diffing technique gave a few answers
- 7E05D3
- 7E0AE7
- 7E0EF7
- 7E1087
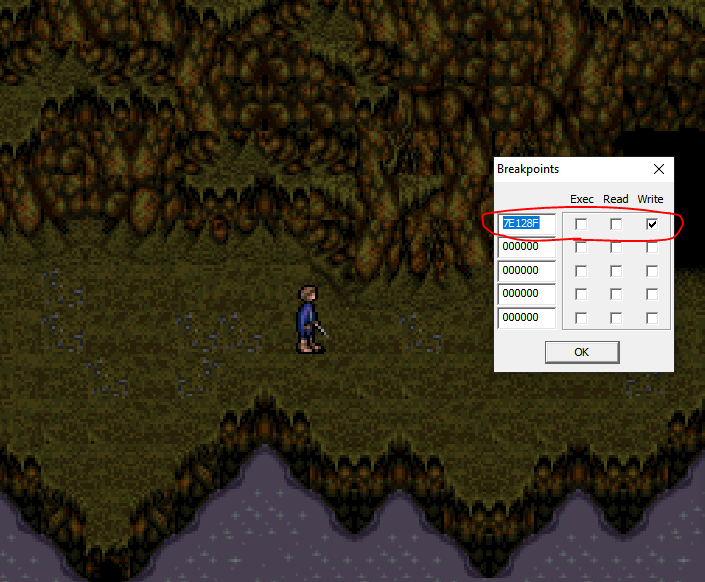
- 7E128F <-- The answer
- 7EFD46
It was a low enough number to rule out the false positives and find the answer:
7E128FThe other values corresponded to position too, but they were an output of it not an input. E.g., changing the value wouldn't stick, except for 7E128F.
2. What position is used for
The next obvious step is to break-on-write of position. We expect it to get hit whenever your character walks around, since it would get updated then. And moreover, we'd expect that code path to not get taken if you're hitting a wall.
Bad news here. The break-on-write will always fire regardless of whether you're moving or not-- the code is set up to always overwrite your position even if it doesn't need to. So that kind of breakpoint won't directly tell us which code paths fire or don't fire based on your hitting a wall.
For the record, it hits here:
$80/C88E 99 8F 12 STA $128F,y[$80:128F] A:0100 X:0000 Y:0000 P:envmxdizcThat's okay. It will at least tell us something, when your position does get updated while moving, and we can still reason about what happens when it doesn't get updated.
And in particular, we can locally disassemble or CPU log to find the preceding operations
...

$80/C883 69 00 00    ADC #$0000              A:0000 X:0000 Y:0000 P:envmxdiZc
$80/C886 99 97 14    STA $1497,y[$80:1497]   A:0000 X:0000 Y:0000 P:envmxdiZc
$80/C889 AA          TAX                     A:0000 X:0000 Y:0000 P:envmxdiZc
$80/C88A 18          CLC                     A:0000 X:0000 Y:0000 P:envmxdiZc
$80/C88B 79 8F 12    ADC $128F,y[$80:128F]   A:0000 X:0000 Y:0000 P:envmxdiZc
$80/C88E 99 8F 12    STA $128F,y[$80:128F]   A:013A X:0000 Y:0000 P:envmxdizc
So some position-increment value gets saved to $80:1497, then increment the position by that number too. We can use this to work backwards and see a bunch of other fields updated as well.
Now we know the neighborhood of the collision code and can reason about the code path involved.
3. Finding the branch
There are a couple ways to proceed from here. There's a 'nice' option and a 'cheesy' option.
The 'nice' option is to take where we know the position is stored, and find the chain of operations done to its value. This works out if the control flow for controlling position is pretty localized-- say, if collision-checking and position-updating is all in one tidy function and they're right next to each other.
Unfortunately, the position-updating logic was messy. It was seemingly tangled up with the logic for checking for interact-ables (e.g., doors, NPCs). So while the 'nice' option is still an option, it's costly. Therefore there's the 'cheesy' option.
The cheesy option is to break on position change, using the information we found above, so we at least have some kind of frame delimiter and something to look for. Then enable CPU logging. Log:
- one 'frame' where you can move, and
- one 'frame' where you're obstructed.
Then strip out IRQs (they create noise), and put the result through a giant diff. I used Meld.
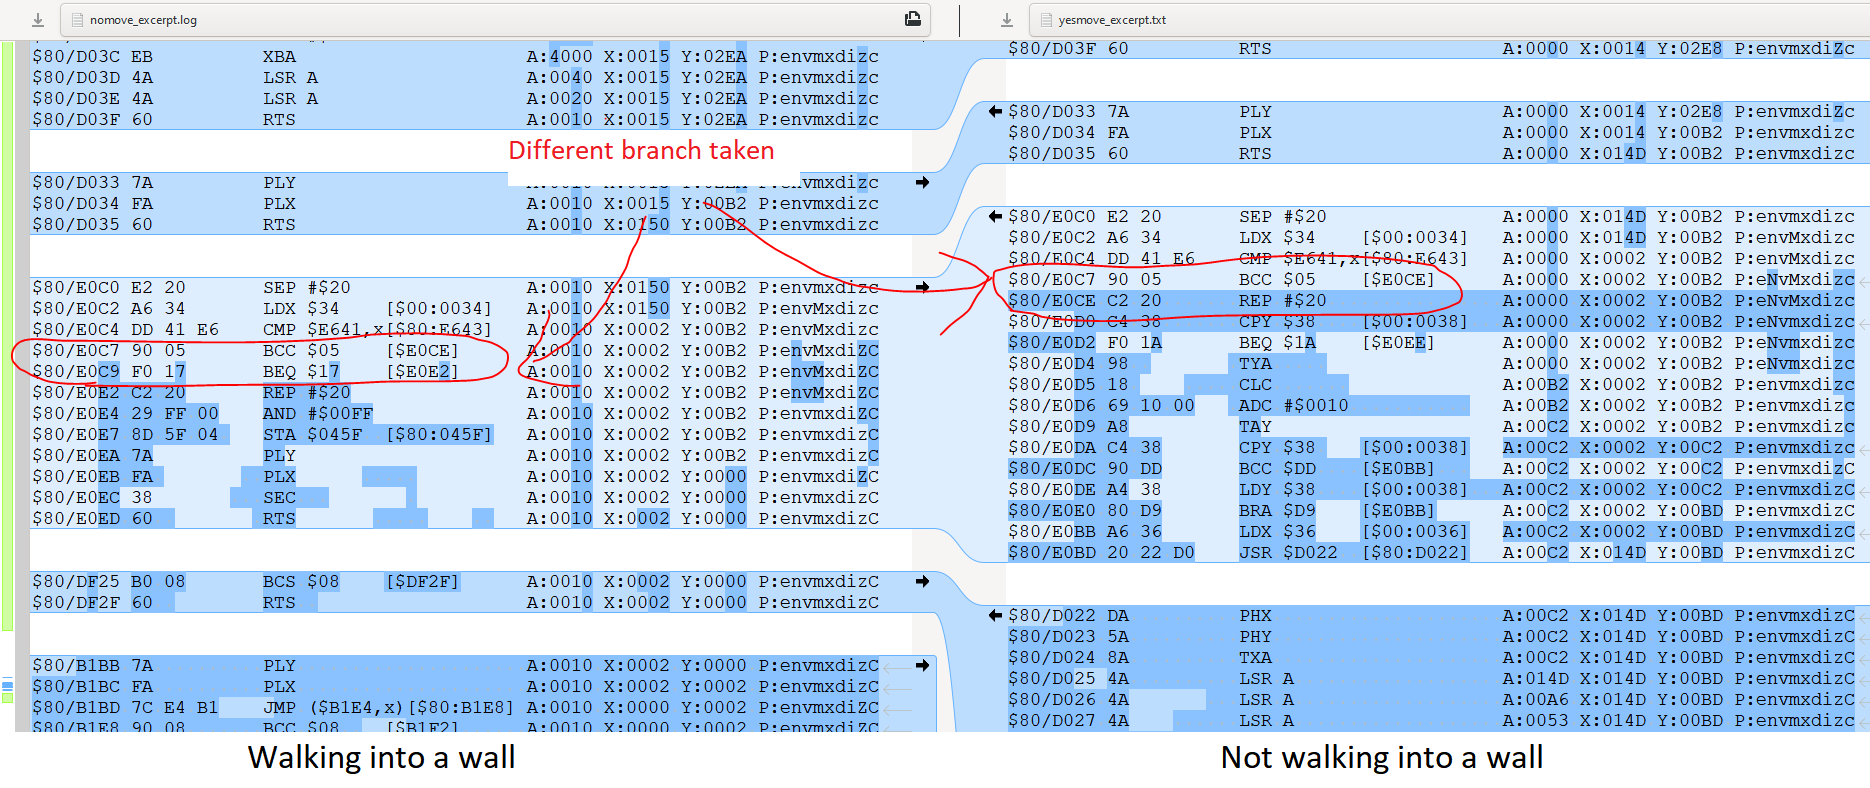
The diff isn't so crazy.
See there's data-divergence up until a certain point. After that, execution-divergence. It was a kind of thing where I scrolled through it and it caught my attention, so not a really thorough debugging experience, anyway the previous stuff to untangle where position is stored helped to understand the data-divergence and filter out noise in the diff.
And that ended up being the answer. The comparison
$80/E0C4 DD 41 E6    CMP $E641,x[$80:E643]   A:0010 X:0002 Y:00B2 P:envMxdizc
$80/E0C7 90 05       BCC $05    [$E0CE]      A:0010 X:0002 Y:00B2 P:envMxdiZC
will check if you're about to collide with a wall, or not. If you're free to move, you take the branch. If you're obstructed, you fall through. Therefore we can disable collisions by always taking the branch. So change
$80/E0C7 90 05 BCC $05 [$E0CE]to
$80/E0C7 80 05 BRA $05 [$E0CE]A quick test will show you this only covers horizontal collisions. Vertical goes down a completely separate code path. I guessed that they shared a common subroutine
$80/E0BD 20 22 D0 JSR $D022 [$80:D022] A:00B2 X:0150 Y:00B2 P:envmxdizCand this ended up being true. Setting a breakpoint on D022 ended up hitting for the vertical case:
$80/D022 DA          PHX                     A:0E05 X:016B Y:0095 P:envmxdizc
$80/D023 5A          PHY                     A:0E05 X:016B Y:0095 P:envmxdizc
$80/D024 8A          TXA                     A:0E05 X:016B Y:0095 P:envmxdizc
$80/D025 4A          LSR A                   A:016B X:016B Y:0095 P:envmxdizc
$80/D026 4A          LSR A                   A:00B5 X:016B Y:0095
...
$80/D033 7A          PLY                     A:0000 X:0016 Y:026C P:envmxdiZc
$80/D034 FA          PLX                     A:0000 X:0016 Y:0095 P:envmxdizc
$80/D035 60          RTS                     A:0000 X:016B Y:0095 P:envmxdizc
$80/E12D E2 20       SEP #$20                A:0000 X:016B Y:0095 P:envmxdizc
at which point it's easy to step out 1 frame and see the caller. And it turns out the caller looks very similar to the horizontal case, with the same kind of branch. It has
$80/E131 D9 41 E6    CMP $E641,y[$80:E643]   A:0000 X:003F Y:0002 P:envMxdizc
$80/E134 90 05       BCC $05    [$E13B]      A:0000 X:003F Y:0002 P:eNvMxdizc
So you can do a similar thing, changing the branch on carry clear to a branch unconditional
$80/E134 80 05 BRA $05 [$E13B] Putting it all together, the two codes are
80E0C780 (Disable horizontal collisions)
80E13480 (Disable vertical collisions)
Here's a demo of it in action, successfully getting past a door.
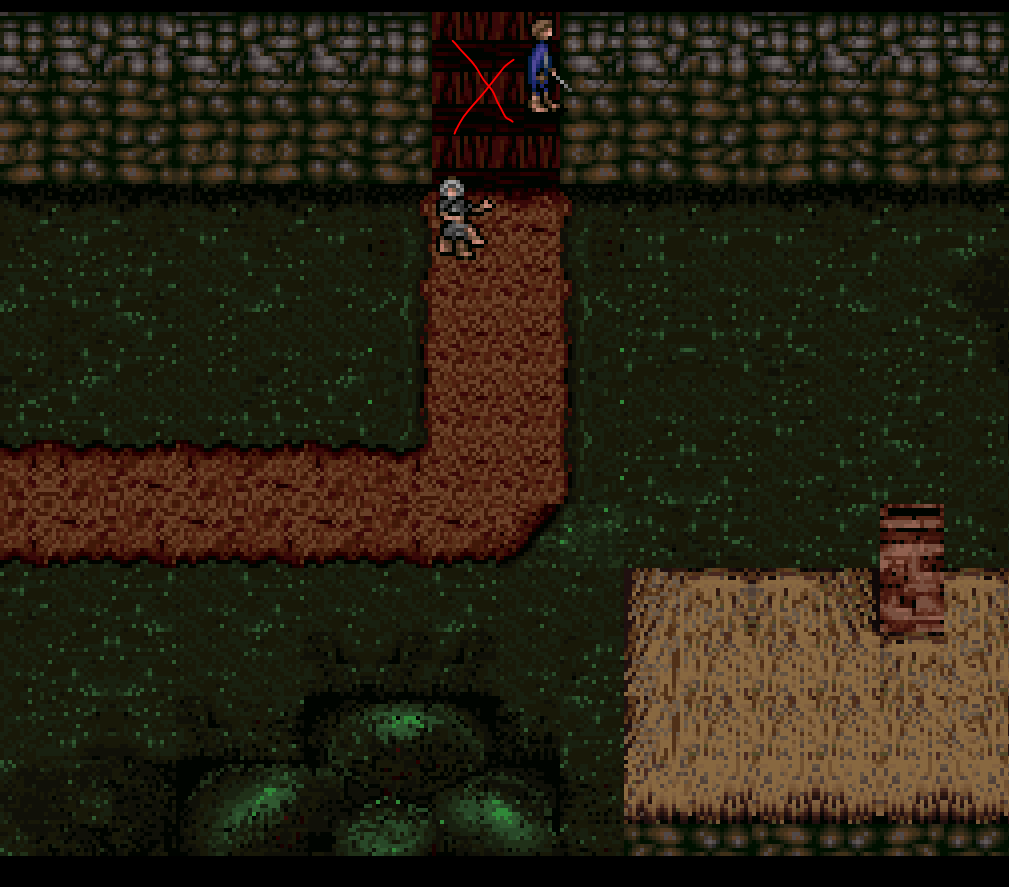
Side thing, I also used the code to get above the door in Bree. That said, even when enabling collisions again, it didn't take me anywhere. So the door's either controlled by non-'physical' means or not implemented.
I was still left with this question of whether we can conclusively say the door is not implemented.
It's one thing to prove a positive, prove a program does something. Easy enough, you show it doing the thing.
It's another thing to prove a negative, to prove a computer program will never do a thing. Can you prove the door can never open? Not ever? You can't really, you can only reach levels of confidence. Can you prove White Hand is not in Pokemon? Can you prove Herobrine is not in Minecraft? Has anyone ever conclusively proven that the pendant in Dark Souls doesn't do anything? Well, see, they ran the program through a simulator and-- just kidding, they went low tech and asked the director, so then it's a social engineering problem of whether you believe him.
When people use formal or other methods to prove program behaviors or nonbehaviors, they exploit constraints in the programming language or execution environment. For example, a language like Haskell has a rich set of constraints which are helpful in proving behavior. Or if a computer is unplugged and has no battery, you have confidence it won't power on. But in our case we're talking about object code, not source code, and we're talking about something the hardware could do. The instruction set of the object code alone doesn't provide helpful constraints. Hell, we can't even universally statically disassemble programs on this platform (because the choice of instruction width is dynamically chosen). Statically prove nonbehavior?
I'm not trying to give credibility to conspiracy theories or the mindset behind that kind of thinking. I'm trying to explain why you might not find a conclusive answer when you might want one. Anyway, through this exercise I got a greater level of confidence that the door doesn't go anywhere.
Some details
- You can use both codes or one at a time.
- Disabling collisions means you also can't interact with objects like doors. If you want to pass through doors, re-enable collisions or enable them for one direction.
- If collisions are disabled for you, they're also disabled for allies, NPCs, and enemies.
- Disabling collisions will let you pass through 'physical' doors in the game, where you're obstructed simply by where you're allowed to walk. For example, the gate in Moria, and the fires on the steps by the Balrog. There can be other 'non-physical' doors, where you need to trigger the right game event (e.g., have a key) to open them.
I used password tricks to get to the end area with all events signaled in any case, and had collisions off. I got to freely walk around the area where you find Galadriel with the mirror.
It turns out, the area is an infinite plane!
It's for the best not to try and rip the level data. /j
To make it so you don't need to water your plants in Harvest Moon for Super Nintendo, use the PAR codes
82A8ACEA
82A8ADEA
Explanation below.
The game 'Harvest Moon' for Super Nintendo has fun elements, but also repetitive ones. One of them that wore on me was having to water your plants. If you water at night, it's not even a skill-based action mechanic since you can restore your energy and night lasts forever. I wanted to experience the game and see its content, but not have the repetitive action of watering.
Idea: patch the game so that watering is not needed
First approach was to take memory dumps before and after watering a tile, and diff them. Seems ok. But, the diffs were too noisy and I didn't know what I was looking for. How were the farm tiles stored? Was it even one byte per tile, one byte per pair of tiles, or something else entirely? I didn't even know that part yet, so I gave up on it.
Instead, I tried something way dumber- keep watering a tile with a view of live memory open, and watch for changes. I had an idea of what the storage could be- one byte per tile, arranged sequentially, so I looked for that. And I planted some test plants in an observable pattern. This plus exploiting timing of changes made it way easier to discern signal from noise and I found it.
There were not one, but two places the tile data lived. For the tile I'm standing near, the first was at 7E1100 and that one I found first. When I left the farm and came back I saw that the data got wiped and restored, so that meant it's a cache and not the primary copy.
Looking for a dupe of it in memory, I found that at 7EAC30, more likely to be the primary copy.
From experimenting I found this out about the tile storage:
- It is one byte per tile
- Tiles are stored sequentially. Nothing too crazy.
And as for what tile value means what thing, I found
| Tile Value | What It Means |
| 0x00 | Untilled, unwatered ground |
| 0x01 | Untilled, unwatered ground (different graphic from above) |
| 0x07 | Tilled, unwatered ground |
| 0x08 | Tilled, watered ground |
| 0x58 | Unwatered potato seed |
| 0x59 | Watered potato seed |
| 0x68 | Unwatered turnip seed |
| 0x69 | Watered turnip seed |
(Not exhaustive.)
From the data points there are, watering a tile simply increments its value by 1. So when it rains, something must iterate through all the tiles and increment their value by 1.
To find out what that is, I set a break-on-write of 0x7EAC32, the location of the top-left plant, looking for the value to change from 0x58 to 0x59. This took me right into this code
(Paste below is multiple debugging transcripts spliced together so don't put too much stock in the reg values.)
void ProcessWeather()
...
$82/8390 8F 1E 1F 7F STA $7F1F1E[$7F:1F1E]   A:0400 X:0400 Y:0400 P:eNvMxdizc
$82/8394 22 D6 89 82 JSL $8289D6[$82:89D6]   A:0400 X:0400 Y:0400 P:eNvMxdizc

// Call UpdateFarmTiles, transcribed below
$82/8398 22 11 A8 82 JSL $82A811[$82:A811]   A:0400 X:0400 Y:0400 P:eNvMxdizc

$82/839C 22 09 82 82 JSL $828209[$82:8209]   A:0400 X:0400 Y:0400 P:eNvMxdizc
...


void UpdateFarmTiles() - $82/A811
// Preconditions:
//    Weather is stored at $7E0196. 0x0 means sunny, 0x2 means rainy.
//    Farm data is stored around $7EAC30.
// This function is called when you sleep, no matter the weather or if you save.

$82/A811 E2 20       SEP #$20                A:0007 X:000E Y:0002 P:envmxdizC
$82/A813 C2 10       REP #$10                A:0007 X:000E Y:0002 P:envMxdizC
$82/A815 A9 04       LDA #$04                A:0007 X:000E Y:0002 P:envMxdizC
$82/A817 8D 81 01    STA $0181  [$00:0181]   A:0004 X:000E Y:0002 P:envMxdizC
$82/A81A C2 20       REP #$20                A:0004 X:000E Y:0002 P:envMxdizC
$82/A81C A0 00 00    LDY #$0000              A:0004 X:000E Y:0002 P:envmxdizC
$82/A81F A2 00 00    LDX #$0000              A:01E0 X:0400 Y:01E0 P:eNvmxdizc

StartProcessingTile:
$82/A822 5A          PHY                     A:00D0 X:00D0 Y:01D0 P:eNvmxdizc
$82/A823 DA          PHX                     A:00D0 X:00D0 Y:01D0 P:eNvmxdizc
$82/A824 86 82       STX $82    [$00:0082]   A:00D0 X:00D0 Y:01D0 P:eNvmxdizc
$82/A826 84 84       STY $84    [$00:0084]   A:00D0 X:00D0 Y:01D0 P:eNvmxdizc
$82/A828 20 3C B1    JSR $B13C  [$82:B13C]   A:00D0 X:00D0 Y:01D0 P:eNvmxdizc
$82/A82B E2 20       SEP #$20                A:074D X:074D Y:01D0 P:envmxdizc

// Load the state for a tile in your farm. We look at just 1 byte
$82/A82D BF E6 A4 7E LDA $7EA4E6,x[$7E:AC33] A:074D X:074D Y:01D0 P:envMxdizc

; Do various things for the different tile types.
$82/A831 D0 03       BNE $03    [$A836]      A:0758 X:074D Y:01D0 P:envMxdizc
$82/A836 C9 03       CMP #$03                A:0758 X:074D Y:01D0 P:envMxdizc
$82/A838 B0 03       BCS $03    [$A83D]      A:0758 X:074D Y:01D0 P:envMxdizC
$82/A83A 4C 1B A9    JMP $A91B  [$82:A91B]   A:0701 X:074F Y:01D0 P:eNvMxdizc
$82/A83D C9 A0       CMP #$A0                A:0758 X:074D Y:01D0 P:envMxdizC
$82/A83F 90 03       BCC $03    [$A844]      A:0758 X:074D Y:01D0 P:eNvMxdizc
$82/A844 C9 06       CMP #$06                A:0758 X:074D Y:01D0 P:eNvMxdizc
$82/A846 D0 03       BNE $03    [$A84B]      A:0758 X:074D Y:01D0 P:envMxdizC
$82/A84B C9 07       CMP #$07                A:0758 X:074D Y:01D0 P:envMxdizC ; Is tilled soil?
$82/A84D F0 55       BEQ $55    [$A8A4]      A:0758 X:074D Y:01D0 P:envMxdizC
$82/A84F C9 08       CMP #$08                A:0758 X:074D Y:01D0 P:envMxdizC
$82/A851 D0 03       BNE $03    [$A856]      A:0758 X:074D Y:01D0 P:envMxdizC
$82/A856 C9 1E       CMP #$1E                A:0758 X:074D Y:01D0 P:envMxdizC
$82/A858 F0 4A       BEQ $4A    [$A8A4]      A:0758 X:074D Y:01D0 P:envMxdizC
$82/A85A C9 1F       CMP #$1F                A:0758 X:074D Y:01D0 P:envMxdizC
$82/A85C D0 03       BNE $03    [$A861]      A:0758 X:074D Y:01D0 P:envMxdizC
$82/A861 C9 1D       CMP #$1D                A:0758 X:074D Y:01D0 P:envMxdizC
$82/A863 D0 03       BNE $03    [$A868]      A:0758 X:074D Y:01D0 P:envMxdizC
$82/A868 C9 20       CMP #$20                A:0758 X:074D Y:01D0 P:envMxdizC
$82/A86A B0 03       BCS $03    [$A86F]      A:0758 X:074D Y:01D0 P:envMxdizC
$82/A86F C9 39       CMP #$39                A:0758 X:074D Y:01D0 P:envMxdizC
$82/A871 D0 03       BNE $03    [$A876]      A:0758 X:074D Y:01D0 P:envMxdizC
$82/A876 C9 53       CMP #$53                A:0758 X:074D Y:01D0 P:envMxdizC
$82/A878 D0 03       BNE $03    [$A87D]      A:0758 X:074D Y:01D0 P:envMxdizC
$82/A87D C9 61       CMP #$61                A:0758 X:074D Y:01D0 P:envMxdizC
$82/A87F D0 03       BNE $03    [$A884]      A:0758 X:074D Y:01D0 P:eNvMxdizc
$82/A884 C9 6F       CMP #$6F                A:0758 X:074D Y:01D0 P:eNvMxdizc
$82/A886 D0 03       BNE $03    [$A88B]      A:0758 X:074D Y:01D0 P:eNvMxdizc
$82/A88B C9 79       CMP #$79                A:0758 X:074D Y:01D0 P:eNvMxdizc
$82/A88D D0 03       BNE $03    [$A892]      A:0758 X:074D Y:01D0 P:eNvMxdizc
$82/A892 C9 7C       CMP #$7C                A:0758 X:074D Y:01D0 P:eNvMxdizc
$82/A894 D0 03       BNE $03    [$A899]      A:0758 X:074D Y:01D0 P:eNvMxdizc
$82/A899 C9 70       CMP #$70                A:0758 X:074D Y:01D0 P:eNvMxdizc
$82/A89B B0 69       BCS $69    [$A906]      A:0758 X:074D Y:01D0 P:eNvMxdizc

$82/A89D 29 01       AND #$01                A:0758 X:074D Y:01D0 P:eNvMxdizc	; Mask
$82/A89F F0 03       BEQ $03    [$A8A4]      A:0700 X:074D Y:01D0 P:envMxdiZc
...

$82/A8A4 C2 20       REP #$20                A:0700 X:074D Y:01D0 P:envMxdiZc

$82/A8A6 AD 96 01    LDA $0196  [$00:0196]   A:0700 X:074D Y:01D0 P:envmxdiZc	; Load weather
										; 0x0 means sunny.
										; 0x2 means rainy.

$82/A8A9 29 02 00    AND #$0002              A:0002 X:074D Y:01D0 P:envmxdizc

; If not rainy, skip ahead--
$82/A8AC F0 03       BEQ $03    [$A8B1]      A:0002 X:074D Y:01D0 P:envmxdizc

; If it is rainy, goto IncrementTileValue to mark the tile as watered.
$82/A8AE 4C 06 A9    JMP $A906  [$82:A906]   A:0002 X:074D Y:01D0 P:envmxdizc
...

IncrementTileValue:
; This is a common path for all kinds of tile incrementing, it's not just for rain.

$82/A906 E2 20       SEP #$20                A:0002 X:074D Y:01D0 P:envmxdizc
; Load early-out cond
$82/A908 AF 19 1F 7F LDA $7F1F19[$7F:1F19]   A:0002 X:074D Y:01D0 P:envMxdizc
$82/A90C C9 03       CMP #$03                A:0000 X:074D Y:01D0 P:envMxdiZc	;
$82/A90E F0 59       BEQ $59    [$A969]      A:0000 X:074D Y:01D0 P:eNvMxdizc	;

; Load tile value
$82/A910 BF E6 A4 7E LDA $7EA4E6,x[$7E:AC33] A:0000 X:074D Y:01D0 P:eNvMxdizc

; Apply 'watered' status
$82/A914 1A          INC A                   A:0058 X:074D Y:01D0 P:envMxdizc

WriteRainEffect:
; X=0x74C means just to the right of shipping bin.
; Value of 0x59 means 'watered'.
$82/A915 9F E6 A4 7E STA $7EA4E6,x[$7E:AC32] A:0059 X:074C Y:01D0 P:envMxdizc

; Goto DoneProcessingTile.
$82/A919 80 4E       BRA $4E    [$A969]      A:0059 X:074C Y:01D0 P:envMxdizc
...

OnUntilledSoil:
$82/A91B E2 20       SEP #$20                A:0701 X:074F Y:01D0 P:eNvMxdizc
$82/A91D AF 19 1F 7F LDA $7F1F19[$7F:1F19]   A:0701 X:074F Y:01D0 P:eNvMxdizc
$82/A921 C9 02       CMP #$02                A:0700 X:074F Y:01D0 P:envMxdiZc
$82/A923 F0 44       BEQ $44    [$A969]      A:0700 X:074F Y:01D0 P:eNvMxdizc
$82/A925 C9 03       CMP #$03                A:0700 X:074F Y:01D0 P:eNvMxdizc
$82/A927 F0 40       BEQ $40    [$A969]      A:0700 X:074F Y:01D0 P:eNvMxdizc
$82/A929 AF 1B 1F 7F LDA $7F1F1B[$7F:1F1B]   A:0700 X:074F Y:01D0 P:eNvMxdizc
$82/A92D 29 03       AND #$03                A:0706 X:074F Y:01D0 P:envMxdizc
$82/A92F D0 38       BNE $38    [$A969]      A:0702 X:074F Y:01D0 P:envMxdizc	; Goto DoneProcessingTile
...

DoneProcessingTile:
$82/A969 C2 30       REP #$30                A:0059 X:074C Y:01D0 P:envMxdizc
$82/A96B FA          PLX                     A:0059 X:074C Y:01D0 P:envmxdizc
$82/A96C 7A          PLY                     A:0059 X:00C0 Y:01D0 P:envmxdizc
$82/A96D 8A          TXA                     A:0059 X:00C0 Y:01D0 P:envmxdizc
$82/A96E 18          CLC                     A:00C0 X:00C0 Y:01D0 P:envmxdizc
$82/A96F 69 10 00    ADC #$0010              A:00C0 X:00C0 Y:01D0 P:envmxdizc
$82/A972 AA          TAX                     A:00D0 X:00C0 Y:01D0 P:envmxdizc
$82/A973 E0 00 04    CPX #$0400              A:00D0 X:00D0 Y:01D0 P:envmxdizc
$82/A976 F0 03       BEQ $03    [$A97B]      A:00D0 X:00D0 Y:01D0 P:eNvmxdizc
$82/A978 4C 22 A8    JMP $A822  [$82:A822]   A:00D0 X:00D0 Y:01D0 P:eNvmxdizc

DoneProcessingField:
$82/A97B 98          TYA                     A:0400 X:0400 Y:01D0 P:envmxdiZC
$82/A97C 18          CLC                     A:01D0 X:0400 Y:01D0 P:envmxdizC
$82/A97D 69 10 00    ADC #$0010              A:01D0 X:0400 Y:01D0 P:envmxdizc
$82/A980 A8          TAY                     A:01E0 X:0400 Y:01D0 P:envmxdizc
$82/A981 C0 00 04    CPY #$0400              A:01E0 X:0400 Y:01E0 P:envmxdizc
$82/A984 F0 03       BEQ $03    [$A989]      A:01E0 X:0400 Y:01E0 P:eNvmxdizc
$82/A986 4C 1F A8    JMP $A81F  [$82:A81F]   A:01E0 X:0400 Y:01E0 P:eNvmxdizc
...
This provides enough information to understand how the 'watered' status gets applied. So to apply watered status irrespective of rain, you can just change the branch below
$82/A8A9 29 02 00    AND #$0002              A:0002 X:074D Y:01D0 P:envmxdizc

; If not rainy, skip ahead--
$82/A8AC F0 03       BEQ $03    [$A8B1]      A:0002 X:074D Y:01D0 P:envmxdizc

; If it is rainy, goto IncrementTileValue to mark the tile as watered.
$82/A8AE 4C 06 A9    JMP $A906  [$82:A906]   A:0002 X:074D Y:01D0 P:envmxdizc
to no ops. In other words, change
82A8AC: F0
82A8AD: 03
to
82A8AC: EA
82A8AD: EA
Expressing this as a PAR code, it looks like
82A8ACEA
82A8ADEA
See a demo of the change
It's a bit more fun this way. Enjoy
On WDC 65816, NMI isn't a "real" instruction.
It's a directive ("non-maskable interrupt") typical 65816 assemblers understand.
You use the directive like
NMI MyHandlerwhere MyHandler is a label in the source code.
I had trouble finding this information written anywhere plainly, so I'm writing this in case you or someone else is in the same position as me where you need to know.
In response to NMI, the assembler doesn't directly emit any opcodes. What it will do for SNES, anyway, is
- After assembly, look at the object code address of MyHandler.
- The short, 16-bit address. Why? Because interrupts have to be in bank 0.
- Write the address to 0x7FEA or 0xFFEA, depending on whether it's LoROM or HiROM.
- The rule is that the vectors live in the last page of the first ROM bank, so that's in 0x7FEA for LoROM or 0xFFEA for HiROM.
Fun fact: in Geiger, you can't set a breakpoint to code inside an NMI. Well, you can try, but it won't hit. If you want to see control flow through an NMI, you can use the Logging-CPU feature.
After you assemble and load your program, and execute to something that entails an interrupt, your interrupt handler will get called automagically.
The choice of "what raises NMI" is up to the computer manufacturer. On SNES, the NMI vector is called when VBlank begins. That's just how it is. So sometimes NMI and VBlank get talked about interchangeably on that platform.
And I wish I had known to don't get hardware and software interrupts confused. NMI is different from BRK and COP. Those are software interrupts. They have an instruction, they launch from an opcode. NMI is a hardware interrupt.
For hardware interrupts, the K (program bank reg) gets automatically pushed, then the 16-bit PC is pushed, then the P (processor flags reg) is pushed, then there's this automatic transfer of control to the interrupt handler. You drop everything you're doing and go right to the handler. At least the CPU has the decency to push the execution state beforehand, I guess.
One detail- in emulation mode, the program bank reg does not get pushed. So you probably want to NOT be executing code in a nonzero bank in emulation mode if there's a hardware interrupt, because you don't know where to return to when the interrupt handler is done.
For NMI, the whole thing is no you can't disable it with a processor flag (that is, 'i') so forget trying to disable them either. And since it's a hardware interrupt, it's set up by special vector not by an instruction like BRK or COP. For those software interrupts, you can predict when they'll happen or make it so they're never happen since you know where there's a BRK or COP in your code. Hardware interrupts are different- you can't decide when they occur like that. The condition that raises them is fixed. Fortunately I guess, they're fixed based on something useful like vertical blank. And fair enough, since there are lots of things that are only safe to do during vertical blank.
I haven't had to write code that chases scanlines. I hope you don't either, although it might happen to everyone at some point.
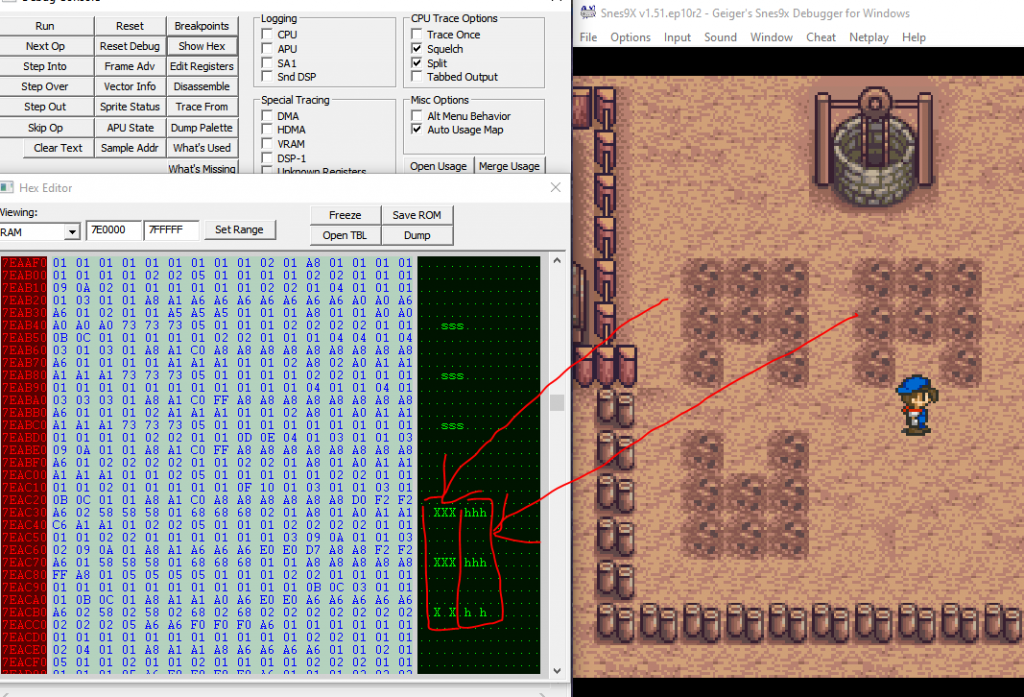
A lot of the SNES reference material I used emphasize 65816 which is great for a while. But you get to a point in debugging SNES where it's not enough to only know things about the CPU. Eventually you will see things in the debugger you can't explain. Since there's more to a computer than just the CPU.
J. R. R. Tolkien's Lord of the Rings for Super Nintendo shipped with a bug as you get toward the later parts of the game.
Short version: use these Pro Action Replay codes to un-glitch the late-game passwords.
81CBF10C
81A3900C
81A35C0C
Longer explanation below.
If you're in Moria past the entrance and the first part and request a password, the game will give you one. However, if you write down and try to use that same password later, the game won't accept it.
This is especially troublesome because
a) it's in the most tedious part of the game, a part you wouldn't ever want to re-do, and
b) even if you back-track to the Moria entrance, it won't go back to giving you valid passwords. The game's password system is basically cursed.
I investigated to understand this more. First, the password validation converts this character into a number.
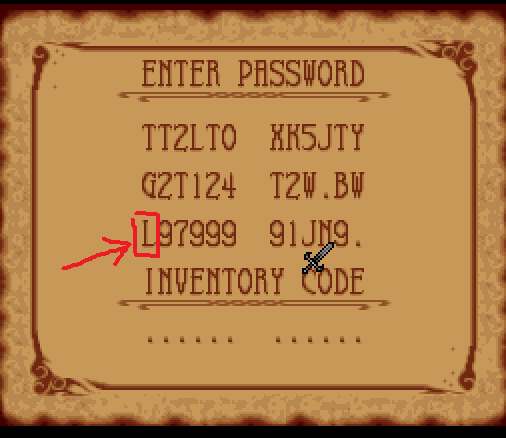
The exact way it does this is described in an earlier post. So for here, L is 9, M would be 10, and so on.
Starting from there, I found out more by
- typing a numerical garbage password like "023741" into the first six characters
- taking memory dump of RAM
- running a relative searcher on the memory dump, looking for a pattern like the one above
- found one result. This was lucky in a bunch of ways. It was lucky how the number was indeed stored contiguously in RAM, not immediately over-written, the password characters' values are sequential (e.g., the value of password character '1' numerically comes right before '2') and that I had picked a unique enough number
- Used that to get the RAM address of the character boxed in red above
- Set a break-on-read of that RAM address in the debugger
- Breakpoint hit when you press the button for password confirm. This also, was a bit lucky. The game only read the password back for initial graphics or when you hit 'confirm'. No reading it back continuously, no noisy breakpoints.
- Stepped through in debugger to see what it did with the password character. When it copied the password character, set break-on-read of that too. This led to un-tangling the password characters from what I called the AreaNumbers below. I saved the code and marked it up with comments and labels.
Password validation calls this function
// Function: ReadPasswordLocationCode()
// Precondition: location code is stored at $81:039C
// Postcondition: result stored in 801CCB, 801CCD, 801CC9.
//   The result is what I'm calling an "AreaNumber"
//    plus positional information about
//    where in the world to load the player.
//
//    Early-game AreaNumbers are high-numbered.
//    Late-game ones are low.
//    Examples:
//      Crossroads is 0x12A.
//      Rivendell is 0x138.
//      Moria Entrance is 0xEF.
//      Moria 1 is 0x51.
//      Moria 2 is 0x0C.

$81/CBEA B9 84 03    LDA $0384,y[$81:039C]   ; Load location code. E.g., the password
                                             ; character 'M', which is 0xA

$81/CBED 29 1F 00    AND #$001F              ; Ignore upper bits
$81/CBF0 C9 0A 00    CMP #$000A
$81/CBF3 90 02       BCC $02    [$CBF7]      ; If the password character is equal or greater than
                                             ;'M' (0xA), fall through
                                             ; to LocationCodeTooHigh.
                                             ; Otherwise, goto LocationCodeOk.

LocationCodeTooHigh:
$81/CBF5 38          SEC
$81/CBF6 6B          RTL                     ; Bail

LocationCodeOk:
$81/CBF7 85 90       STA $90    [$00:0090]
$81/CBF9 A5 90       LDA $90    [$00:0090]
$81/CBFB 0A          ASL A
$81/CBFC AA          TAX

// Write the output
$81/CBFD BF 18 CC 81 LDA $81CC18,x[$81:CC2A]
$81/CC01 8F CB 1C 80 STA $801CCB[$80:1CCB]
$81/CC05 BF 30 CC 81 LDA $81CC30,x[$81:CC42]
$81/CC09 8F CD 1C 80 STA $801CCD[$80:1CCD]
$81/CC0D BF 48 CC 81 LDA $81CC48,x[$81:CC5A]
$81/CC11 8F C9 1C 80 STA $801CC9[$80:1CC9]

$81/CC15 C8          INY
$81/CC16 18          CLC
$81/CC17 6B          RTL
It's pretty easy to see the problem. It validates your location code is too high if you specify 'M' or 'N', but those are codes the game gives you. It was clearly a mistake. Changing the line
$81/CBF0 C9 0A 00 CMP #$000Ato
$81/CBF0 C9 0C 00 CMP #$000Cwill fix it, allowing through AreaNumbers up to N (since a password character N = 11 = 0xB), the maximum the game will give you.
This unblocks the password validation code. But, if you were to patch the above change and try it, you'd see the screen fade but hang there forever spinning in a long loop and hard locked not loading the level. So we're not out of the woods yet.
Terminology
Crashed, halted- the game's computer stopped executing instructions
Hard lock- the game's computer is executing instructions, but it appears unresponsive to inputs e.g., the screen is black
Soft lock- the game displays graphics and appears responsive but can not be won
The hang happens because we get past the password-validation and into level-loading yet there's parts of the level loading code that block out AreaNumbers belonging to Moria.
We get here
// Function: AreaLoadStaging()
// Preconditions: Location codes have been written to 801CCB, 801CCD 801CC9
// Expected behavior: Sanitize out bad location codes (e.g., bad
//   AreaNumbers) and call a common function AreaLoadHelper().
// AreaLoadHelper() is a common channel used during both password-based
// loading and normal level loading as you move from one place to another
// in the game.

$81/A377 E2 30       SEP #$30
$81/A379 AF 0E 1D 80 LDA $801D0E
$81/A37D CF 72 03 80 CMP $800372
$81/A381 F0 76       BEQ $76
$81/A383 AF 72 03 80 LDA $800372
$81/A387 30 70       BMI $70
$81/A389 C2 20       REP #$20
$81/A38B AF C5 1C 80 LDA $801CC5          ; Load the area number.

$81/A38F C9 54 00    CMP #$0054
$81/A392 B0 52       BCS $52    [$A3E6]   ; If area number < 54, fall through to
                                          ; InvalidAreaNumber_TooLow.
                                          ; Otherwise, goto ValidAreaNumber.

InvalidAreaNumber_TooLow:
$81/A394 E2 20       SEP #$20
$81/A396 AF 0E 1D 80 LDA $801D0E
$81/A39A C9 04       CMP #$04
$81/A39C D0 0E       BNE $0E
$81/A3AC E2 20       SEP #$20
$81/A3AE A9 00       LDA #$00
$81/A3B0 48          PHA
$81/A3B1 AF 72 03 80 LDA $800372
$81/A3B5 48          PHA
$81/A3B6 F4 06 00    PEA $0006
$81/A3B9 22 02 80 81 JSL $818002
$81/A3BD 85 34       STA $34              ; Fall through into BadLoop

BadLoop:
$81/A3BF A9 00       LDA #$00
$81/A3C1 48          PHA
$81/A3C2 AF 72 03 80 LDA $800372
$81/A3C6 48          PHA
$81/A3C7 F4 06 00    PEA $0006
$81/A3CA 22 02 80 81 JSL $818002
$81/A3CE C5 34       CMP $34
$81/A3D0 F0 ED       BEQ $ED
// This hangs forever :(

ValidAreaIndex:
$81/A3E6 E2 20       SEP #$20
$81/A3E8 A9 00       LDA #$00
//... clipped for brevity
This code snippet makes reference to another function I'm calling AreaLoadHelper. I'm not posting the code to AreaLoadHelper because it's veering a bit off topic. If you want to see the code for that, it's here. Look for 'Function: AreaLoadHelper() - 801D0D'.
Looking through, it's possible they originally intended for bad location codes to do something more elegant than a hang in this function (early out?). Or perhaps not, if they were sure this code wasn't reachable.
Anyway, changing
$81/A38F C9 54 00 CMP #$0054to
$81/A38F C9 0C 00 CMP #$000C fixes it here. The AreaNumbers for the last two levels are 0051 and 000C, so 0C covers it. The fact that it's the same number as patched above is really a coincidence.
If you were to apply this change and run the game, you would still see the same symptom as before where the screen would fade to black yet no level would get loaded. This is because it gets further in the level-loading code before getting stuck again. It was a very loose spin. I had an unpleasant debugging experience. That's because if you break in the debugger while it's hanging, you're too late. The root cause of the hang was here
// Function: CallAreaLoadHelperArg4 ($81:A33A)
//  Preconditions: An AreaNumber is passed in through address $80:1CC5.
//  Expected result: Validate the AreaNumber.
//    If valid, push the argument '4' onto the stack and then call AreaLoadHelper(),
//    a common code path shared between password-loading usual traversal
//    through the game world.
$81/A33A E2 30       SEP #$30
$81/A33C AF 0E 1D 80 LDA $801D0E
$81/A340 CF 72 03 80 CMP $800372
$81/A344 F0 2E       BEQ $2E
$81/A346 AF 72 03 80 LDA $800372
$81/A34A 30 28       BMI $28
$81/A34C C2 20       REP #$20
$81/A34E AF C3 1C 80 LDA $801CC3
$81/A352 C9 EF 00    CMP #$00EF
$81/A355 F0 09       BEQ $09
$81/A357 AF C5 1C 80 LDA $801CC5

$81/A35B C9 54 00    CMP #$0054            ; Load AreaNumber
$81/A35E 90 14       BCC $14    [$A374]    ; If too low, goto InvalidLocation.
                                           ; If okay, fall through to ValidAreaNumber

ValidAreaNumber:
$81/A360 E2 20       SEP #$20
$81/A362 A9 00       LDA #$00
$81/A364 48          PHA
$81/A365 AF 72 03 80 LDA $800372
$81/A369 48          PHA
$81/A36A F4 00 01    PEA $0100
$81/A36D F4 04 00    PEA $0004             ; Push args
$81/A370 22 02 80 81 JSL $818002[$81:8002] ; Call AreaLoadHelper()

InvalidLocation:
$81/A374 C2 30       REP #$30
$81/A376 6B          RTL
Another place where the validation is on the wrong bounds.
So, change
$81/A35B C9 54 00 CMP #$0054 to
$81/A35B C9 0C 00 CMP #$000Callowing through both within-Moria area numbers, it works.
It is kind of good password-resuming the last two areas was something superficial like this, and not a deeper problem like a huge swath of level loading being actually not implemented. It turns out, the odds a "not implemented" is low anyway, since that part was written in a reasonable way- i.e., if you can visit an area, you can password-resume to it. They share the same code.
As for the fix since the total amount of changes is small, you could use a ROM patch, but it's even easier as a cheat code like a Pro Action Replay code. Expressing the above changes as SNES Pro Action Replay the codes are
81CBF10C
81A3900C
81A35C0C
These are value changes to ROM code (it is not self modified), so if you're applying cheats in an emulator you don't need to re-start the game to apply them.
Here is a demo of the codes in action
I was gonna post this to GameFaqs but they have this

oh well.
Anyway, you can use the cheat codes in a Pro Action Replay device for Super Nintendo, or any mainstream emulator (tested ZSNES, Snes9x) to unblock the game. Enjoy
This is an explanation of the formats of the password used in the game. I found this information by trying different passwords and seeing what is accepted by the game and what the effects were. Since this process didn't involve a debugger it could have been done on the console, but using an emulator sped this up a lot.
This game has a hugely long password (48 characters.)
Each alphanumeric character is one of
.BCDFGHJKLMNPQRSTVWXYZ0123456789That's a '.', the letters of the alphabet with no vowels plus the numbers 0 through 9. This gives 32 choices in total.
The general layout of the password is: (where '.' represents an alphanumeric character)
             Samwise   Merry           Frodo   Pippin
            [       ][       ]       [       ][       ]
             .  .  .  .  .  .         .  .  .  .  .  .


            Legolas   Aragorn          Gimli   Gandalf
            [       ][       ]       [       ][       ]
             .  .  .  .  .  .         .  .  .  .  .  .


Spawn location              keys              Checksum
            [ ][         and events          ][       ]
             .  .  .  .  .  .         .  .  .  .  .  .


                             Inventory
            [                                         ]
             .  .  .  .  .  .         .  .  .  .  .  .
As shown above there's
- 3 characters for each of the 8 people in the fellowship (Boromir isn't joinable)
- 1 character for your spawn location
- 8 characters representing keys and events
- 3 characters for checksum
- and a 12-character inventory code at the bottom labeled 'INVENTORY CODE' in the password input screen.
Following goes into more detail for each of these.
Password characters
The alphanumeric password is a convenience (lol) for the user. Internally the game maps each character in a password to a number.
The mapping is this
Character | Value
------------------
   .      |  0
   B      |  1
   C      |  2
   D      |  3
   F      |  4
   G      |  5
   H      |  6
   J      |  7
   K      |  8
   L      |  9
   M      |  10
   N      |  11
   P      |  12
   Q      |  13
   R      |  14
   S      |  15
   T      |  16
   V      |  17
   W      |  18
   X      |  19
   Y      |  20
   Z      |  21
   0      |  22
   1      |  23
   2      |  24
   3      |  25
   4      |  26
   5      |  27
   6      |  28
   7      |  29
   8      |  30
   9      |  31
In the sections that follow, these numerical representations of password characters get used and there is math done on them.
People in the fellowship
For each joinable person in the fellowship there's a three-character code that encodes their level and equipment.
Firstly, if the three character code is all '.' (value zeroes), that character is not in your party. Otherwise yes they are in your party.
The way in which the codes determine equipment is a bit convoluted and broken. The reason I say that is there are some
passwords that are accepted by the game but will either crash the game or cause corrruption while you're playing. The charts and things below describe passwords which are accepted and also don't crash or corrupt the game.
You can find situations (e.g., what if Code3, described below, is less than 16?) where the password gets accepted, the level gets loaded and things appear okay but corruption happens when you go into the menu for example. I reverse engineered what level/items you get in those cases too, and they're accounted for in the source code of my password editor. I'm leaving them out of this document so that these formulas stay neat and concise as they're specified, because those don't follow the rules listed below. If you want you can see source code here for more info on them
So anyway, each person in the fellowship gets a three-character code in the password. Call the three characters in the code
Code1, Code2, and Code3 in order.
For example if the password contained 'B89' then Code1=1, Code2=30, Code3=31 referring to the chart above. Yes, each of
Code1, Code2 and Code3 is a number between 0 and 31 inclusive.
Level is decided by the following:
if (Code1 < 10)
	Level = (Code2 mod 8) * 20 + Code1
else
	Level = (Code2 mod 8) * 20 + (Code1 mod 16) + 10
The 'mod' operator here is modulus. I.e., A mod B is the remainder when A is divided by B.
Armor is decided by the following:
 PW char 2  |     Code2      | Armor
--------------------------------------------------------------
. through F |  0 through 4   | If Code3 is even, Cloth Cloak.
            |                | If Code3 is odd, Plate Mail.
--------------------------------------------------------------
. through F |  0 through 4   | If Code3 is even, Cloth Cloak.
            |                | If Code3 is odd, Plate Mail.
--------------------------------------------------------------
K through P |  8 through 12  | If Code3 is even, Padded Armor.
            |                | If Code3 is odd, Mithril Armor
--------------------------------------------------------------
T through Y |  16 through 20 | Leather Armor
--------------------------------------------------------------
2 through 6 |  24 through 28   Chain Mail
Weapons are decided by the following:
PW char 3| Code3 | Weapon
 ----------------------------
  T      |  16   | Old Dagger
  V      |  17   | Old Dagger
  W      |  18   | Dagger
  X      |  19   | Dagger
  Y      |  20   | Barrow Dagger
  Z      |  21   | Barrow Dagger
  0      |  22   | Troll Dagger
  1      |  23   | Troll Dagger
  2      |  24   | Elvish Dagger
  3      |  25   | Elvish Dagger
  4      |  26   | Sting
  5      |  27   | Sting
  6      |  28   | Light Sword
  7      |  29   | Light Sword
  8      |  30   | Sword
  9      |  31   | Sword
The password encoding for level, weapon and armor works the same for each of the 8 joinable characters.
Fun fact: if you enter an only-partially-valid password that includes some configuration for a character (e.g., the string is not all '.'), it permanently adds the character to your party until SNES reset. Even if the password is rejected. This leads to a well-known cheesy trick where you can enter a bad password, press start and hear the "invalid password" noise, then delete it and start the game with all the Fellowship unlocked.
Spawn Location
This is the place in the game world your party will be in after the password gets accepted.
It's a 1-character code.
PW char| Code | Location
-------|------|------------
  .    |  0   | Hobbiton
  B    |  1   | Brandywine Bridge
  C    |  2   | Farmer Maggot
  D    |  3   | Ferry
  F    |  4   | Crickhollow
  G    |  5   | Tom Bombadil's House
  H    |  6   | Barrow Downs Stones
  J    |  7   | Crossroads
  K    |  8   | Rivendell
  L    |  9   | Moria entrance
  M    |  10  | Moria 1 (glitched)
  N    |  11  | Moria 2 (glitched)
For the last two Moria locations, the game will include those location codes in the passwords it provides to you when you're in Moria.
However, it won't accept the passwords the next time you start the game 🙁 (Update: unless you have my bug fix described in this post)
Might want to keep a map of Moria, you definitely don't want to do it more than once if you can help it
Keys and events
These control the state of various unlockable doors and questlines. I haven't investigated which bits control what because it wasn't important to what I was trying to do.
Checksum
The checksum exists to stop you from trying random passwords and cheating. It's a way of making sure the only passwords accepted are ones the game has actually given to you, not ones you randomly made up yourself.
However, the checksum is pretty easy to understand if you look at the various passwords it gives you. For example, you'll see that leveling up or changing equipment only changes the first character. And using something in your inventory only changes the third character. And, you know how the password characters translate to character codes and there are 32 of them, and modulus kinds of operations are common and inexpensive for computing checksums.
The first character is the 'party checksum':
partySum = the sum of the character codes of the first two lines of the password
checksumCode = remainder when partySum is divided by 32. (For example, if partySum is 33, the checksumCode is 1.)
The second character is the 'event checksum':
eventSum = the sum of the character codes in the "spawn location" and "keys and events" part of the password
checksumCode = remainder when eventSum is divided by 32
The third character is the 'inventory checksum':
inventorySum = the sum of the character codes in the "inventory" part of the password
checksumCode = remainder when inventorySum is divided by 32
This gives you the first, second and third characters of the checksum in order.
I think they put the checksum in the middle of the password to obfuscate it a little bit.
If you're trying to troubleshoot, know that valid checksum doesn't necessarily mean the password will be accepted. The game sometimes rejects passwords for reasons other than invalid checksum. For example, if you specify an invalid location code like 'Z'.
Inventory
These character codes store your inventory state pretty compactly.
Each item corresponds to 1 bit within a byte. Not all the bits are used, which is why a full inventory's password code looks like "9S9S9S 9S9S9S" rather than all 9s (all 9s means all bits set).
There are 12 inventory code characters in all, which I'm calling code 0 through 11.
For readability the bit is written as a hexadecimal flag.
Item                |Code #| Bit
--------------------------------
Tomb Key            |  0   | 0x1
Moria Key           |  0   | 0x2
Red Gateway Gem     |  0   | 0x4
Elvish Book         |  0   | 0x8
Magic Rock          |  0   | 0x10

Bottle              |  1   | 0x1
Lost Amulet         |  1   | 0x2
Maggot Note         |  1   | 0x4
Scroll Of Floi      |  1   | 0x8

Gate Key            |  2   | 0x1
Moria Key           |  2   | 0x2
Yellow Gateway Gem  |  2   | 0x4
Book Of The Ages    |  2   | 0x8
Gold Piece          |  2   | 0x10

Jug Of Honey        |  3   | 0x1
Lost Amulet         |  3   | 0x2
Old Willow Note     |  3   | 0x4
Scroll Of Oin       |  3   | 0x8

Tomb Key            |  4   | 0x1
Moria Key           |  4   | 0x2
Gateway Keystone    |  4   | 0x4
Book Of Mazarbul    |  4   | 0x8
Gold Pieces         |  4   | 0x10

Eye Glasses         |  5   | 0x1
Lost Amulet         |  5   | 0x2
Note From Gandalf   |  5   | 0x4
Color Scoll         |  5   | 0x8
Item |Code #| Bit
---------------------------------
Tomb Key | 6 | 0x1
Moria Key | 6 | 0x2
Green Gateway Gem | 6 | 0x4
Bilbo Diary | 6 | 0x8
Gold Pieces | 6 | 0x10
Healing Moss | 7 | 0x1
Lost Amulet | 7 | 0x2
Letter To Elrond | 7 | 0x4
Keystone Scroll | 7 | 0x8
Tomb Key | 8 | 0x1
Boat Oar | 8 | 0x2
Purple Gateway Gem | 8 | 0x4
Jeweled Ring | 8 | 0x8
Gold Pieces | 8 | 0x10
Athelas Major | 9 | 0x1
Lost Amulet | 9 | 0x2
Horn Of Boromir | 9 | 0x4
Long Bow | 9 | 0x8
Key To Bree | 10 | 0x1
Healing Mushroom | 10 | 0x2
Violet Gateway Gem | 10 | 0x4
The Ring | 10 | 0x8
Athelas Minor | 10 | 0x10
Healing Fruit | 11 | 0x1
Lost Amulet | 11 | 0x2
Magic Fern | 11 | 0x4
Orb of Drexle | 11 | 0x8 The inventory codes come from bitwise OR-ing the corresponding bits together for each inventory item you have.
For example, suppose you have the first tomb key and the red gateway gem. This is bit '0x1' and '0x4'. When you bitwise-OR these, you get '5'. Code 5 corresponds to password code 'G', from the chart all the way at the top. So if those two are the only items you have, your inventory code in the password is 'G….. ……'.
For another example, suppose all you have is the first tomb key and the Orb of Drexle. This is bit '0x1' of the first code, and '0x8' of the last. So if those were the only two items you have, your inventory code in the password is 'B….. …..K'.
There's one special case- although there's an inventory bit allocated to the One Ring, the ring is always in your inventory regardless of whether it's encoded in the password or not.
Links
Hope you found this helpful
All this information is used in a password editor I made. That is here
https://github.com/clandrew/lotrpwcheck/
To view this post in text form, it's here
https://raw.githubusercontent.com/clandrew/lotrpwcheck/master/Format.txt
This post is following up from this one where I posted the editor, where someone asked about the information that the editor uses
This post describes how to change players' names arbitrarily (longer or shorter) in the game NHL '94 for Super Nintendo by changing the ROM.
Players' names are shown as text in the menus and in-game.
In the team selection menu, it's their first initial and last name. In other places, it's the full first and last name.
Goal is to change how names appear in all these places. Have new names' length be allowed to be different from the old names.
My own intended usage for this is to only change a few names, so optimize for that. And optimize for game stability because I plan to play the game, not just do a quick demo. I don't care if the result is not elegant or wasteful in terms of memory. The result can operate on an expanded ROM.
The Very Easy, Very Limited Way
Easiest way to change names is a pure data hack. Doesn't require any knowledge about SNES at all, only basic computer literacy. Open the ROM in a hex editor such as HxD. Scroll down until you see players' names on the right, and type over them. Hit Ctrl+S to save. Start your game and go.
Why does this work? Because all player names are literally stored as ASCII, no need for character translation tables or whatever. Also, each name is only stored in 1 place for the most part.
But of course, the catch is whatever new name you pick has to be the same length or shorter. Ideally, the same length. Shorter only kind of works because you can pad names with spaces, but no guarantees that'll look right when you see it laid out on the screen. And if the new name is longer it definitely won't work. Since the goal is to let you change names without length restrictions we have to do something more.
The reasons why you can't change the name length as a pure data hack take some context to explain. So they are explained further down. The first thing you need to know is the data you just tried to hack- what is it, really.
Player-data Format
This describes where and how players' names are stored in the ROM, as well as the neighboring data.
There is what I'm calling a "main pointer table". The table has 28 values. This table is stored at ROM address 0x9CA5E7.
If you dump the raw data for the table it's
 	4F EB 9C 00 AC AB 9C 00 32 AE 9C 00 C1 B0 9C 00
 	40 B3 9C 00 4F C0 9C 00 D7 B5 9C 00 9D B8 9C 00
 	4D E9 9C 00 1D BB 9C 00 B2 BD 9C 00 DB C2 9C 00
 	7E C5 9C 00 2B C8 9C 00 9C CA 9C 00 06 CD 9C 00
 	AC CF 9C 00 37 D2 9C 00 D2 D4 9C 00 60 D7 9C 00
 	D4 D9 9C 00 4A DC 9C 00 DC DE 9C 00 7E E1 9C 00
 	AD E6 9C 00 05 E4 9C 00 57 A6 9C 00 04 A9 9C 00
Formatted nicely, the table is
int mainTable[] = {
    9CEB4F, // Anaheim
    9CABAC, // Boston
    9CAE32, // Buffalo
    9CB0C1, // Calgary
    9CB340, // Chicago
    9CC04F, // Dallas
    9CB5D7, // Detroit
    9CB89D, // Edmonton
    9CE94D, // Florida
    9CBB1D, // Hartford
    9CBDB2, // LA Kings
    9CC2DB, // Montreal
    9CC57E, // New Jersey
    9CC82B, // NY Islanders
    9CCA9C, // NY Rangers
    9CCD06, // Ottawa
    9CCFAC, // Philly
    9CD237, // Pittsburgh
    9CD4D2, // Quebec
    9CD760, // San Jose
    9CD9D4, // St Louis
    9CDC4A, // Tampa Bay
    9CDEDC, // Toronto
    9CE17E, // Vancouver
    9CE6AD, // Washington
    9CE405, // Winnepeg
    9CA657, // All Stars East
    9CA904  // All Stars West
};
There is 1 value per hockey team.
The first element in the array belongs to Anaheim, and the value is 0x9CEB4F.
The second element in the array belongs to Boston, and the value is 0x9CABAC, and so on.
The teams are ordered alphabetically, except for the all-stars teams at the end. The values themselves aren't in any particular order.
Although the all-stars teams are comprised of players which exist on other teams, they have their own entries in the table. That's the game opting for perf and simplicity of code in the perf-memory tradeoff.
Looking at the values of elements in this array, you might think they also look like ROM addresses and you would be right.
As for what's stored at each address- here's a description
[H0] [H1] [some number of header bytes] // A two-byte low-endian length H, and a variable-length
                                        // header stream of length H-2

For each player:
[L0] [L1] [player's name]     // A two-byte low-endian length L, and then a variable-length string
                              // of length L-2

[PlayerNumber]                // A byte for the player number. It's in a decimal format.
                              // Leftmost half-byte is the tens place value. Rightmost half-byte is
                              // the ones place value.

[WeightClass, Agility]        // A byte. Leftmost half-byte is the player's weight class.
                              // Rightmost half-byte is their agility rating.
                              // Weight class is displayed as a measurement in pounds when
                              // displayed on the team roster page.
                              // To convert from weight class to pounds, it's
                              // 	pounds = 140 + (weightClass * 8)
                              // Weight classes range from 0 to 14 in practice. Higher numbers may
                              // be hacked.
                              // Agility rating is from 0 to 6.

[Speed, OffenseAware]         // A byte. Leftmost half-byte is player's speed. Rightmost half-byte
                              // is their offense awareness rating.
                              // Ratings are from 0 to 6.

[DefenseAware, ShotPower]     // A byte. Leftmost half-byte is player's defense awareness rating.
                              // Rightmost half-byte is their shot power.
                              // Ratings are from 0 to 6.

[Checking, Handedness]        // A byte. Leftmost half-byte is player's checking rating. Rightmost
                              // half-byte is their handedness.
                              // Checking rating is from 0 to 6.
                              // For handedness, if the value is even (divisible by 2) they shoot
                              // left. If it's odd they shoot right.

[StickHandling, ShotAccuracy] // A byte. Leftmost half-byte is player's stick handling rating.
                              // Rightmost half-byte is their shot accuracy.
                              // Ratings are from 0 to 6.

[Endurance, Roughness]        // A byte. Leftmost half-byte is player's endurance rating. Rightmost
                              // half-byte is their 'roughness' rating.
                              // Ratings are from 0 to 6.
                              // The 'roughnesss' stat is a hidden stat. It exists but is not
                              // displayed in the game or the manual.


[PassAccuracy, Aggression]    // A byte. Leftmost half-byte is player's pass accuracy rating.
                              // Rightmost half-byte is their aggression rating.
                              // Ratings are from 0 to 6.
Then, at the end:
[00] [00]		      // Two zero bytes mean that's the end of the player data for this
                              // team.
For example, if we dereference and dump what's stored at 9CC2DB (Montreal), we get
55 00 0E 00 79 02 1D 00 0E 00 13 00 15 00 52 11
21 E8 49 C5 00 01 12 11 07 03 0C 04 00 01 17 12
07 03 0C 04 00 01 16 11 08 04 0E 03 00 01 13 14
09 05 0D 03 00 01 12 11 07 03 0C 05 00 01 13 14
08 04 05 03 00 01 11 17 07 06 03 0D 00 01 16 13
03 0D 07 06 00 0D 00 50 61 74 72 69 63 6B 20 52
6F 79 33 66 44 46 00 00 55 66 ...
Cleaned up, this is
Cleaned up, this is

headerSize = 0x0055;
byte header[] = {0E 00 79 02 1D 00 0E 00 13 00 15 00 52 11
                 21 E8 49 C5 00 01 12 11 07 03 0C 04 00 01 17 12
                 07 03 0C 04 00 01 16 11 08 04 0E 03 00 01 13 14
                 09 05 0D 03 00 01 12 11 07 03 0C 05 00 01 13 14
                 08 04 05 03 00 01 11 17 07 06 03 0D 00 01 16 13
                 03 0D 07 06 00 };

player0 = {
    // L0 L1 P  a  t  r  i  c  k  __ R  o  y
       0D 00 50 61 74 72 69 63 6B 20 52 6F 79 // "Patrick Roy"
                                              // 11 character length +
                                              // 2 byte string size = 13 = 0xD, converted to
                                              // two-byte low endian that's 0D 00
       33 // Number 33
       66 // Weight class 6, agility 6
       44 // speed 4, OffAware 4
       46 // DefAware 4, shot power 6
       00 // checking 0, handedness L
       00 // stick handling 0, shot accuracy 0
       55 // endurance 5, roughness 5
       66 // pass accuracy 6, aggression 6
}
Etc, for the rest of the players. Then there are some team-related strings at the end.
Heads up that viable (e.g., a subsequent team's) game data can follow immediately after the data for each team. So no, you're not free to grow things off the end.
Side thing: stats stored affect the stats in-game although you'll notice they don't correlate to those stats exactly. That's because each game applies RNG. Try it yourself if you want. Boot the game, pick two teams and look at a player's stats. Reset the game, pick the exact same matchup and player to look at. The stats will be slightly different. If you play a lot of sports games maybe this is not surprising. There is this real-world idea that any team could potentially beat any other team.
Strings are stored with a length rather than being delimited, so that's nice. However, there's a bunch of player data parsing code that needs to skip over player's names to get to their stats. So if you make a player's name shorter, you'd need to either pad with spaces (could cause things to display weirdly) or update the length value and move that person's stats plus everyone else on the team's data backwards. I've listed all the stats out because you need to know how much to move if you do it that way, and it's also helpful to know what it is you're moving.
And of course for making player's names longer, there isn't any extra space off the end, so you need something else entirely. This was the case I was more interested in.
Why not move the whole team data, and update the "main pointer table" entry?
This seemed like a swell idea at first. To get names as long as you want, just make a totally new copy of the player data someplace else with your new names, then adjust the "main pointer table" value to point to it.
Unfortunately that won't work. It is true the "main table" above is a table of long (four-byte) pointers. But, the upper two bytes of each entry are either
- dead data, sometimes
- dead data, always
By "dead data" I mean the data isn't read and doesn't do anything.
Instead of reading data from the upper two bytes, the game will use a hardcoded number which is $9C.
Here's an example of what I mean. This is from the code to figure out a player's first initial and last name for the team selection screen.
			                      ; Precondition: 9F1CDC and $9f1CDE have been
                                              ; initialized with
			                      ; main table elements for home and away teams
                                              ; respectively.
			                      ; We're in 16-bit mode.
			                      ;
$9F/C732 A9 9C 00    LDA #$009C               ; Hardcode $9C in the upper part
$9F/C735 85 8B       STA $8B
$9F/C737 A4 91       LDY $91
$9F/C739 B9 DC 1C    LDA $1CDC,y[$9F:1CDC]    ; Load the short pointer from the main table
$9F/C73C 85 89       STA $89                  ; Store the short pointer in the lower part
                                              ;
                                              ; ... do stuff that uses direct addressing on
                                              ; 24-bit pointer. For example, ADC [$89].
There are multiple instances of this pattern. I found several without trying super hard and I believe there are more. If you want to change a "main pointer table" entry, you don't just change the entry- you need to change some undetermined number of places in game code.
Why store long pointers in the table if they were gonna do it this way? They could have just stored short pointers. Seems like a waste of space. It might have been, they started out planning for long pointers but wanted to optimize reading/dereferencing of the table values, then they never tried to go back and shrink the table.
Anyway, it's hard to safely detect all the places that pull values out of this table so it's difficult to "fix" the table and reclaim the space. I didn't try. If you want to try it to be absolutely safe you might want to set a breakpoint in the debugger and play the game extensively. We don't have source code and you can't statically disassemble this platform.
So suppose you begrugingly accept the fact that all table entries need to live in bank $9C. Can you change lower bytes only and make that work? Unfortunately that's not such a good idea either. You can adjust these table values to point someplace else in bank $9C, but there isn't all kinds of free space in that bank to put anything.
If we want to move player data (including player names' string data) to a different location in memory, a different bank- I prefer a safer option that is more targeted. Completely bypass the use of the "main pointer table" entry JUST when we are loading player names. This lets us be really confident in things working. We make a code change in a specific, testable place that we understand really well.
Detouring the loading of player names
NHL '94 has a function I'm calling LookupPlayerName().
The code for LookupPlayerName() is
                                             ; Function: LookupPlayerName()
                                             ;     Gets the address of a player's name string,
                                             ; based on the player's index on the team and some
                                             ; previously-set table data.
                                             ;
                                             ; Preconditions:
                                             ;     $91 contains HomeOrAway. 0 == home, 2 == away
                                             ;     $9F1CDC and $9F1CDE have been initialized with
                                             ;     main table elements for home and away teams
                                             ; respectively.
                                             ;     $A5 contains PlayerIndexOnTeam
                                             ;
                                             ; Postconditions:
                                             ;     $89-$8B = Address of the player's name string
                                             ; data. (Includes the length field that comes first)
                                             ;
                                             ; $A5 gets scrambled.

$9F/C732 A9 9C 00    LDA #$009C              ; Hardcode 9C in the upper bytes. Easy enough.
$9F/C735 85 8B       STA $8B    [$00:008B]   ;
                                             ;
$9F/C737 A4 91       LDY $91    [$00:0091]   ; Load the choice of HomeOrAway. 0 == home, 2 == away
$9F/C739 B9 DC 1C    LDA $1CDC,y[$9F:1CDC]   ; Load PlayerNamesStartAddress for the corresponding
                                             ; team.
                                             ; As mentioned in the preconditions this has been set
                                             ; up for us. As it happens, it's somewhere far away in
                                             ; the chain of function calls.
$9F/C73C 85 89       STA $89    [$00:0089]   ; And then store the lower bytes.

LookupPlayerName_GetOffsetOfPerPlayerData:
$9F/C73E A0 00 00    LDY #$0000
$9F/C741 18          CLC
$9F/C742 67 89       ADC [$89]  [$9C:C2DB]   ; Use the fact that the first two bytes of the
                                             ; PlayerNamesStartAddress
                                             ; data will give us the offset to the per-player data.

$9F/C744 85 89       STA $89    [$00:0089]   ; For example, for Montreal we add 0x55 to get to the
                                             ; start of the per-player data.

$9F/C746 80 0A       BRA $0A    [$C752]      ; Goto LookupPlayerName_CheckDone

LookupPlayerName_ForEachPlayerIndexOnTeam:
$9F/C748 A5 89       LDA $89    [$00:0089]   ; Load the length of the player's name.
$9F/C74A 18          CLC
$9F/C74B 67 89       ADC [$89]  [$9C:C330]   ; Increment the current $89-$8B pointer by the length
$9F/C74D 69 08 00    ADC #$0008              ; Plus 8, it's padding (Not really but let's pretend
                                             ; it is)
$9F/C750 85 89       STA $89    [$00:0089]   ; Update the current $89-$8B pointer

LookupPlayerName_CheckDone:
$9F/C752 C6 A5       DEC $A5    [$00:00A5]
$9F/C754 10 F2       BPL $F2    [$C748]      ; branch-if-positive
                                             ;  LookupPlayerName_ForEachPlayerIndexOnTeam

$9F/C756 6B          RTL
The idea is to detour this function. Use an "alternate main table" which actually does honor the long pointer, and shim LookupPlayerName() to use the "alternate main table" instead. From testing I found that LookupPlayerName() is a centralized place and changing it is sufficient.
How the detouring goes is we chuck a payload someplace there's space (say, $A08100, in expanded ROM space). Then replace the code for LookupPlayerName() with
$9F/C732 5C 00 81 A0 JMP $A08100                ; Jump into expanded ROM space where we put the
                                                ; detour payload
                     NOP
                     NOP
                     ...
NOPs are not strictly needed but added for hygiene. (Could use a BRK instead when you are getting things running)
As for the payload itself, it's
$A0/8100 DA          PHX                        ; Caller doesn't like it if X is scrambled
         A4 91       LDY $91                    ; Load the team index, which has been stored at
                                                ; 9F1C98/9F1C9A for home/away.
         B9 98 1C    LDA $1C98, y[$9F:1C98]

         0A          ASL                        ; Multiply by 4 to turn index into an offset
         0A          ASL

         AA          TAX                        ; Use the team index to look up into the
                                                ; "alternate main table".
         BF 00 D0 A8 LDA 0xA8D000,x             ; Load the array element from 0xA8D000, store it in
                                                ; $89-$8C
         85 89       STA $89
         E8          INX
         E8          INX
         BF 00 D0 A8 LDA 0xA8D000,x
         85 8B       STA $8B

                                                ; The "alternate main table" is formatted a bit
                                                ; differently from the "main table".
                                                ; Each element is itself an array, one four-byte
                                                ; element per player.
                                                ; Use $A5 as a counter to get to the right player.

PlayerIndexIncrement:
        A5 A5        LDA $A5                    ; Sets Z
        F0 0C        BEQ $0C                    ; goto DonePlayerIndex

        E6 89        INC $89
        E6 89        INC $89
        E6 89        INC $89
        E6 89        INC $89
        C6 A5        DEC A5
        80 F0        BRA $F0                    ; goto PlayerIndexIncrement

DonePlayerIndex:
                                                ; We have the element for the right player stored
                                                ; at $89-$8C.
                                                ; The element is a pointer.
                                                ; It'll be either $9Cxxxx if we're keeping the
                                                ; original names, or $A8xxxx/whatever if
                                                ; we're using new names.
                                                ; Dereference it, and store the dereferenced result
                                                ; at $89-$8C.
        A7 89        LDA [$89]
        48           PHA
        E6 89        INC $89
        E6 89        INC $89
        A7 89        LDA [$89]
        85 8B        STA $8B
        68           PLA
        85 89        STA $89

        FA           PLX                        ; Restore X and return.
        6B           RTL
One thing that allows the detour to work is there's nothing in the detour that requires execution out of bank $9F (bank $9F is where the original function is). It's okay if the code executes in bank $A8. And by a stroke of good fortune, it happens that the original code is also okay running from other banks. No absolute short addressing (local bank). This is hugely helpful when getting things up and running.
The "alternate main table" lives at 0xA8D000, chosen arbitrarily.
If this code were a bit smaller it could actually be copied overtop the implementation of LookupPlayerName() with no jumping out. Original LookupPlayerName is 37 bytes, this routine is 55 bytes. Alas, it won't fit, so I put it at $A08100. Not a big deal since we are putting stuff in expanded ROM space anyway.
Putting it all together, the full list of things to patch are
- the JMP at the beginning of LookupPlayerName
- code snippet above it's supposed to JMP to
- the "alternate main table" at 0xA8D000 and set of tables each of its entries points to
- the strings that the "alternate main table" points to
Not too bad.
Could do all this manually. I suggest making a program to do it so that you don't make mistakes. And plus you can easily configure whatever new player names you want. I made an editor that does the above.
Example in the editor:

Patched game result
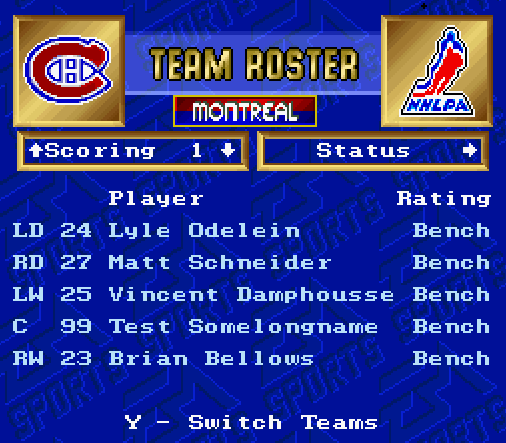
Enjoy
Download the editor here:
https://github.com/clandrew/nhl94e/releases/tag/v1.0
Or, find the editor source code here
https://github.com/clandrew/nhl94e
Find this post, in text form here:
https://raw.githubusercontent.com/clandrew/nhl94e/main/docs/PlayerNames.txt
This post explains Lagoon_hitbox.ips, a proof-of-concept patch created to enlarge the hitboxes in the game Lagoon for SNES. The patch was really quick+and+dirty. Nonetheless it's posted here:
http://secretplace.cml-a.com/edits.php
What follows is a description of the patch and how it works.
First, here are some useful memory locations
$01:0502-0503 - NASIR's X position in the map
$01:0504-0505 - NASIR's Y position in the map
$01:050A- The direction NASIR is facing.
	- 00 means right
	- 01 means down
	- 02 means left
	- 03 means up

$01:B710-B717 - The offsets of NASIR's hit box from his position, if he is facing right
$01:B718-B71F - The offsets of NASIR's hit box from his position, if he is facing down
$01:B720-B727 - The offsets of NASIR's hit box from his position, if he is facing left
$01:B728-B730 - The offsets of NASIR's hit box from his position, if he is facing up
In Lagoon, the following code is invoked whenever an action button is pressed, even if you're not near anything.
$01/9BBD AD 0A 05    LDA $050A               ; A = the direction NASIR is facing.
					     ;
$01/9BC0 0A          ASL A                   ; A *= 8
$01/9BC1 0A          ASL A                   ;
$01/9BC2 0A          ASL A                   ;
$01/9BC3 18          CLC                     ;
$01/9BC4 69 20       ADC #$20                ; A += 0x20
					     ;
					     ; Now A effectively stores an array index with
					     ; which to load hitbox offsets.
					     ; If facing right: A = 0x20
					     ; If facing down: A = 0x28
					     ; If facing left: A = 0x30
					     ; If facing up: A = 0x38
					     ;
$01/9BC6 20 C3 B6    JSR $B6C3	             ; Call CalculatePlayerHitboxDimensions()
$01/9BC9 60          RTS
The function CalculatePlayerHitboxDimensions() looks like the following
CalculatePlayerHitboxDimensions:
					     ; Preconditions: A is set to one of
					     ;     {0x20, 0x28, 0x30, 0x38} depending on
					     ;     the direction NASIR is facing, as described
					     ;     above.
					     ; Postconditions: $40, $42, $44, and $46 contain
					     ;     the dimensions of NASIR's hit box; left,
					     ;     right, top and bottom respectively.
$01/B6C3 C2 20       REP #$20
$01/B6C5 A8          TAY
$01/B6C6 AD 02 05    LDA $0502               ; Load NASIR's X position
$01/B6C9 18          CLC
$01/B6CA 79 F0 B6    ADC $B6F0,y             ; Add left edge hitbox offset to NASIR's X position
$01/B6CD 85 40       STA $40                 ; Store it as an output
					     ;
$01/B6CF AD 02 05    LDA $0502 		     ; Load NASIR's X position
$01/B6D2 18          CLC
$01/B6D3 79 F2 B6    ADC $B6F2,y             ; Add right edge hitbox offset to NASIR's X position
$01/B6D6 85 42       STA $42                 ; Store it as an output
					     ;
$01/B6D8 AD 04 05    LDA $0504               ; Load NASIR's Y position
$01/B6DB 18          CLC
$01/B6DC 79 F4 B6    ADC $B6F4,y             ; Add top edge hitbox offset to NASIR's Y position
$01/B6DF 85 44       STA $44                 ; Store it as an output
					     ;
$01/B6E1 AD 04 05    LDA $0504               ; Load NASIR's Y position
$01/B6E4 18          CLC
$01/B6E5 79 F6 B6    ADC $B6F6,y             ; Add bottom edge hitbox offset to NASIR's Y position
$01/B6E8 85 46       STA $46                 ; Store it as an output
					     ;
$01/B6EA 29 FF 00    AND #$00FF              ; Clean up and return
$01/B6ED E2 20       SEP #$20
$01/B6EF 60          RTS
If you were to skim the code quickly you'd see it loads hitbox dimensions from memory. From that, you might get the impression they are something dynamic. But, they come from a table hard-coded in ROM data. (you can see this based on the particular address they're loaded from).
Just so you know, the hitbox table data contains this (Semantics are left, right, top, bottom)
Facing  	Raw data			Plain hex offsets		Signed dec offsets
------		--------			-----------------		------------------
Right		00 00 19 00 F8 FF 08 00		0h, 19h, FFF8h, 8h		0, 25, -8, 8
Down		F0 FF 10 00 00 00 0F 00		FFF0h, 10h, 0h, 0Fh		-16, 16, 0, 15
Left		E7 FF 00 00 F8 FF 08 00		FFE7h, 0h, FFF8h, 8h		-25, 0, -8, 8
Up		F0 FF 10 00 F1 FF 00 00		FFF0h, 10h, FFF1h, 0h		-16, 16, -15, 0
Yes, the game uses slightly differently-sized hitboxes depending on the direction you're facing.
Now, the patch. What this patch does is instead of offsetting NASIR's position by values from this table, it hacks it to offset the position simply by a hardcoded number. The hardcoded numbers yield bigger hitboxes than the offsets from the table.
It always applies the hitbox of offsets {-0x30, 0x32, -0x38, 0x30 } = {-48, 50, -56, 48 }. The hitbox size is 98x104 which is about 5 times bigger than the default.
The patch modifies just four operations in CalculatePlayerHitboxDimensions:
CalculatePlayerHitboxDimensions:
					     ; Preconditions: A is set to one of {0x20, 0x28, 0x30, 0x38} depending on
					     ;     the direction NASIR is facing, as described above.
					     ; Postconditions: $40, $42, $44, and $46 contain the dimensions of
					     ;     NASIR's hit box; left, right, top and bottom respectively.
$01/B6C3 C2 20       REP #$20
$01/B6C5 A8          TAY
$01/B6C6 AD 02 05    LDA $0502               ; Load NASIR's X position
$01/B6C9 18          CLC
$01/B6CA E9 30 00    SBC #$0030              ; Apply left edge hitbox offset -30h
$01/B6CD 85 40       STA $40                 ; Store it as an output
					     ;
$01/B6CF AD 02 05    LDA $0502 		     ; Load NASIR's X position
$01/B6D2 18          CLC
$01/B6D3 69 32 00    ADC #$0032              ; Apply left edge hitbox offset 32h
$01/B6D6 85 42       STA $42                 ; Store it as an output
					     ;
$01/B6D8 AD 04 05    LDA $0504               ; Load NASIR's Y position
$01/B6DB 18          CLC
$01/B6DC E9 38 00    SBC #$0038              ; Apply left edge hitbox offset -38h
$01/B6DF 85 44       STA $44                 ; Store it as an output
					     ;
$01/B6E1 AD 04 05    LDA $0504               ; Load NASIR's Y position
$01/B6E4 18          CLC
$01/B6E5 69 30 00    ADC #$0030              ; Apply left edge hitbox offset 30h
$01/B6E8 85 46       STA $46                 ; Store it as an output
					     ;
$01/B6EA 29 FF 00    AND #$00FF              ; Clean up and return
$01/B6ED E2 20       SEP #$20
$01/B6EF 60          RTS
And there you have it, the code for the proof-of-concept posted at the link above.
Here is a small improvement that can be made to the above hack. First, it'd be cleaner to modify the hitbox region offsets in the ROM directly. So let's do that instead.
To re-iterate, the default values are (with semantics left, right, top, bottom)-
Facing  	Raw data			Plain hex offsets		Signed dec offsets
------		--------			-----------------		------------------
Right		00 00 19 00 F8 FF 08 00		0h, 19h, FFF8h, 8h		0, 25, -8, 8
Down		F0 FF 10 00 00 00 0F 00		FFF0h, 10h, 0h, 0Fh		-16, 16, 0, 15
Left		E7 FF 00 00 F8 FF 08 00		FFE7h, 0h, FFF8h, 8h		-25, 0, -8, 8
Up		F0 FF 10 00 F1 FF 00 00		FFF0h, 10h, FFF1h, 0h		-16, 16, -15, 0
The ROM file offsets for each direction are
Facing		Headerless ROM file offset
------		--------------------------
Right		B710
Down		B718
Left		B720
Up		B728
While we can patch the table manually, it makes for easier testing of changes if you use a patching program.
Here's some C++ code for one:
enum Direction
{
    FacingRight = 0,
    FacingDown = 1,
    FacingLeft = 2,
    FacingUp = 3
};

struct HitboxDir
{
    int Left;
    int Right;
    int Top;
    int Bottom;
};

void PushValue(int b, std::vector<unsigned char>* out)
{
    if (b >= 0)
    {
        assert(b < 256);
        out->push_back(b); // little endian
        out->push_back(0);
    }
    else
    {
        int u = 0x10000 + b;
        int low = u & 0xFF;
        out->push_back(low);
        u >>= 8;
        assert(u < 256);
        int high = u & 0xFF;
        out->push_back(high);
    }
}

int main()
{
    FILE* pB = nullptr;

    fopen_s(&pB, "Lagoon.hitbox.v2.smc", "rb");

    // Check size
    fseek(pB, 0, SEEK_END);
    long sizeB = ftell(pB);
    fseek(pB, 0, SEEK_SET);

    std::vector<unsigned char> dataB;
    dataB.resize(sizeB);

    fread(dataB.data(), 1, sizeB, pB);

    fclose(pB);

    HitboxDir allDirs[] =
    {
        {0, 25, -8, 8},
        {-16, 16, 0, 15},
        {-25, 0, -8, 8},
        {-16, 16, -15, 0}
    };

    // Enlarge hitboxes
    int ff = 3;
    int hf = 2;

    allDirs[FacingRight].Right *= ff;
    allDirs[FacingRight].Top *= hf;
    allDirs[FacingRight].Bottom *= hf;

    allDirs[FacingDown].Bottom *= ff;
    allDirs[FacingDown].Left *= hf;
    allDirs[FacingDown].Right *= hf;

    allDirs[FacingLeft].Left *= ff;
    allDirs[FacingLeft].Top *= hf;
    allDirs[FacingLeft].Bottom *= hf;

    allDirs[FacingUp].Top *= ff;
    allDirs[FacingUp].Left *= hf;
    allDirs[FacingUp].Right *= hf;

    // Transfer hitbox info into byte data
    std::vector<unsigned char> hitboxBytes;

    for (int i = 0; i < 4; ++i)
    {
        PushValue(allDirs[i].Left, &hitboxBytes);
        PushValue(allDirs[i].Right, &hitboxBytes);
        PushValue(allDirs[i].Top, &hitboxBytes);
        PushValue(allDirs[i].Bottom, &hitboxBytes);
    }

    // Patch the new tables in
    int destOffset = 0xB710;
    for (size_t i = 0; i < hitboxBytes.size(); ++i)
    {
        dataB[destOffset + i] = hitboxBytes[i];
    }

    fopen_s(&pB, "Lagoon.hitbox.v3.smc", "wb");
    fwrite(dataB.data(), 1, dataB.size(), pB);
    fclose(pB);

}
Running this patching program yields the table
Facing  	Raw data			Plain hex offsets		Signed dec offsets
------		--------			-----------------		------------------
Right		00 00 4B 00 F0 FF 10 00		0h, 4Bh, FFF0h, 10h		0, 75, -16, 16
Down		E0 FF 20 00 00 00 2D 00		FFE0h, 20h, 0, 2Dh		-32, 32, 0, 45
Left		B5 FF 00 00 F0 FF 10 00		FFB5h, 0h, FFF0h, 10h		-75, 0, -16, 16
Up		E0 FF 20 00 D3 FF 00 00		FFE0h, 20h, FFD3, 0h		-32, 32, -45, 0
Find a convenient, buildable version of patcher here: https://github.com/clandrew/lagoonhitbox/
You can use the patcher to change the hitboxes as you want. If this concept seems useful then it'd be a good idea to fuss with the values until they yield something desirable.
Note:
- All ROM file offsets are on headerless ROMs.
- The hitboxes calculated from the routine described here is used for both talking to NPCs, and combat. While there might be a motive to affect only combat, there've also been complaints that the hitboxes when talking to NPCs are too fussy, so YMMV.
- If you make the hitboxes obscenely large it can make the game hard to play. For example, if NPCs A and B are standing close to each other, attempting to talk to A might acidentally cause conversation with B.
This post is also available in text form here:
https://raw.githubusercontent.com/clandrew/lagoonhitbox/master/lagoon_patch_info.txt
Finished Arcana (SNES).
Play as Rooks, an orphaned magic card user who needs to stop an evil empress vying to take over the kingdom. Rooks also wants to live up to his late father's legacy.
Turn-based JRPG, Wizardry-like, with "cards" being a prominent visual motif and somewhat gameplay motif. Unique qualities: no backtracking, death of anyone in your party == game over
The use of cards in the gameplay would lead you to think the game has a combat system way more evolved than the old "Fight Magic Item Flee". It does not.
There is a rock-paper-scissors-style elemental system. The game is balanced such that you can ignore it. There are also four pokemon ("Spirits") which act like party members except disposable and only their magic is any good.
Pop quiz: magic spell called "Attribute 6". What does it do, take a guess? Bonus: how it is different from Attribute 5.
I think people might not play this game any more because of the enemy system. What enemy system? Random encounters. How many? A lot. It has one of the worst grinds. Find enclosed: random encounters every two steps in the map, or on simply a 90 degree turn. If not for the in-game map it would have been a big problem. Although there's items and spells to hightail it out of a dungeon, you always enter a dungeon from the very beginning.
Lack of checkpointing is a problem for one of the largest areas called "Stavery Tower", a twelve-floor maze. You can't save while in a dungeon, not even a save-to-be-deleted-on-resume (those are not popular on SNES platform anyway). So you will need to book one to three hours per game session. Alternatively, you can leave your SNES on and hope there isn't a power outage, or use a piece of technology which rhymes with asdflemulator.
Still, the first 5 minutes and the last 30 minutes were Awesome. This game has a great soundtrack and visual style with a lot of character. The final boss concept is extremely cool. This game, you can tell what they were going for.


They are so uncommon let's take a second to appreciate SNES games with functional loading screens.
Game: Civilization 1
Loading time: ~40 seconds
Purpose: When you create a new game. It is procedurally generating the terrain of the map, placing the other civilizations you're playing with. Rather than a fixed map, it gets randomly generated each time plus the algorithm is customizeable to include different kinds of climates and features. The longest load time I have seen on this platform.

A video: https://youtu.be/oWtVe2qm7_w?t=129 (not mine, random search off youtube)
Game: Romance of the Three Kingdoms IV: Wall of Fire
Loading time: 2 or 3 seconds
Purpose: When you create a new game. Procedurally generating what commander has what resource allocations, which officers are where. Although the game comes with a fixed set of "scenarios", you can create your own commander and/or officers and choose who to control. I believe this, plus the difficulty level affects where the game places things and there are too many combinations to pre-compute them.
Game: Another World (also called, Out of this World)
Loading time: ~10 seconds
Purpose: Transitioning out of a simple menu, into the game
This game is, in a word, ambitious. Big, lush backgrounds with lots of things animating. Nothing looks like 'sprites'; they look like 2D vector graphics rasterized to low resolution to be honest.
This game was originally for Amiga and ported to SNES. The graphics have a unique style which unfortunately doesn't fit well to SNES technical constraints, which tend to involve either conventional 2D graphics modes with heavily re-used sprites, or just Mode 7-- neither of which fit this game well. Now that's not to say it can't work. Take, for example, the backgrounds of Super Mario RPG or Wonder Project J. You can make smart judgments about when to re-use sprites and try to hide them among the other elements. Of course, those games were designed from the ground-up for SNES. For this game, conversion to sprites would be an after-thought with the port. The sheer amount of graphics this game has is very large and scenes are organized in ways that are hard to break down into patterned elements.
While I don't tend to like this type of game- the latency of controls is so slow and loose, for one-- I respect its commitment to the unique art style. Given everything this game has going on, the loading screen is not frivolous.
Game: Sim City
Loading time: ~12 seconds
Purpose: When previewing the terrain on which to build your city- there are 1000 terrains (e.g., random seeds). Note that the load time is NOT just for creating a game with the level- it's to let you view a small 120x100 image. This, plus the instantaneous "OK" button tells us two things. First, there was not enough space on the cart to store 1000 of these images. Second, unpacking the preview image is about the same as unpacking the full map. While I think all of this is okay, they could have done with fewer better-optimized seeds. Fortunately the instruction manual has a couple pages of previews of maps which you can flip through quickly.

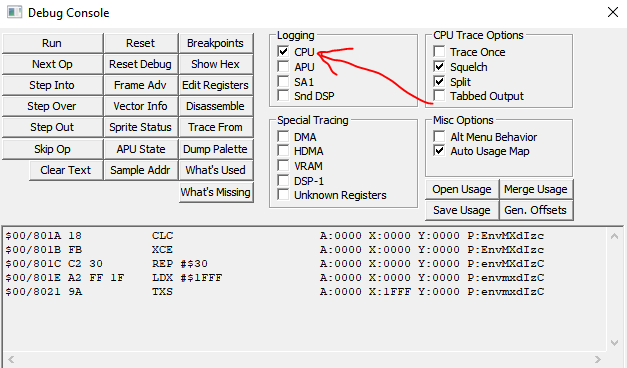
Game: Batman Forever
Loading time: ~5 seconds
Purpose: Transitioning out of cutscene into gameplay. Likely to be graphics-related. There are big, detailed sprites with lots of frames of animation.
Although there's an explanation for a load screen, it may not have been completely necessary. At 24Mbit, the cart is not that small; it's very likely the graphics could fit without super aggressive compression schemes. Some contributing factors to the need for load time may have been 1) the fact that this game is a port, and there wasn't time to optimize for any particular platform, and 2) these flashy 3D wireframe-map montage scenes, which would require different types of data and loader code.
Although this game gets a bad rap I respect its live-action-to-low-res-low-color Mortal Kombat aesthetic.

Maybe others I haven't encountered yet.
See, a couple big things affecting our modern conception of loading screens are optical media and network latency's failure to keep up with increasing size of game payloads. Computationally, modern computers have advanced a lot to the point where it is rare to see games spinning on procedural content like this, but it is common to spend a lot of time copying game assets from an optical medium to faster local solid-state storage, or downloading game assets from the internet.
There have been some modern efforts to curb load times. For example the Nintendo Switch had a return to a faster-than-optical-disk game media. You know, a cartridge. However, many Nintendo Switch games- non-procedural, fixed-level action games do have loading screens- screens which would have been unacceptable in 1995 but are acceptable now since we are used to them.